Today I'm going to talk about how I learn a new programming language. Let me start by saying that I've never fully mastered a programming language, or even come close. My roles are that of sysadmin and not of an actual programmer. What generally happens is I'm given some task to accomplish, such as modify an already written report in our home brewed application. I will dive into the report and figure out where I need to start modifying things. Or I need to come up with a new process, but since the rest of the home brewed application is written in PHP, I'll write the new process in PHP as well, just to keep everything consistent.
I learn programming by looking at running code and modifying it to do something else or do the same thing but better or more accurately. I have trouble reading through a book and doing the simple examples and building upon that knowledge. It comes from already knowing a bit about programming and feeling dumb for re-reading what a variable is and how to assign it (pretty much the same in all programming languages).
At my last position I was able to learn a lot of PHP and I became very comfortable with it. I had worked with PHP a bit prior to this, but honestly, I had forgotten most of what I had learned. In this case, that is probably for the best, it was all spaghetti code and crap for the most part. The one thing that helped me the most was a good editor (Netbeans for PHP) and of course documentation.
My new position is with a firm that runs perl for nearly 100% of their code base. I've always had a hard time reading perl code in the past (Mostly nagios plugins). Perl uses a lot of syntax that doesn't explain what its doing just by reading it in english. So my typical take something that works and modify it has been a slower process. I'm able to get the end result that I'm looking for, but I wouldn't say "I UNDERSTAND HOW" this code works or what it honestly does.
This had led me to reading the first few chapters of a book (http://www.perl.org/books/beginning-perl/) so that I may understand the HOW something works and WHY it works, not just that it does. This might be the first programming book I actually read all the way through! So far some of the wizardry of perl is going away because I know or at least know where to look up what "=~" does and not have to guess. Some other resources I've used is of course Stackoverflow.com. Some of the users there leave answers that don't just give an answer, but explain how and why it works and examples of other ways to do the same thing.
How do you guys learn a programming language? What tools do you find are the best for learning a new programming language?
Showing posts with label skills. Show all posts
Showing posts with label skills. Show all posts
Thursday, May 10, 2012


Monday, September 26, 2011
Changing the from e-mail address in Nagios
This is going to be another short one. I recently had a need to change the FROM address for e-mail from our Nagios installation. E-mail was coming from nagios@host.domain.com, which is non-route-able from outside our network.
The change is very simple. Change the two command lines in your Nagios commands.cfg dealing with notify by e-mail. The command names are "notify-host-by-email" and "notify-service-by-email".
By default these lines read:
/usr/bin/printf "%b" "***** Nagios *****\n\nNotification Type: $NOTIFICATIONTYPE$\nHost: $HOSTNAME$\nState: $HOSTSTATE$\nAddress: $HOSTADDRESS$\nInfo: $HOSTOUTPUT$\n\nDate/ Time: $LONGDATETIME$\n" | /bin/mail -s "** $NOTIFICATIONTYPE$ Host Alert: $HOSTNAME$ is $HOSTSTATE$ **" $CONTACTEMAIL$
and
/usr/bin/printf "%b" "***** Nagios *****\n\nNotification Type: $NOTIFICATIONTYPE$\n\nService: $SERVICEDESC$\nHost: $HOSTALIAS$\nAddress: $HOSTADDRESS$\nState: $SERVICESTATE $\n\nDate/Time: $LONGDATETIME$\n\nAdditional Info:\n\n$SERVICEOUTPUT$" | /bin/mail -s "** $NOTIFICATIONTYPE$ Service Alert: $HOSTALIAS$/$SERVICEDESC$ is $SERVICESTATE$ **" $CONTACTEMAIL$
To change the from address you append " -- -f nagios@domain.com", that is without the quotes of course. So the new lines look like:
/usr/bin/printf "%b" "***** Nagios *****\n\nNotification Type: $NOTIFICATIONTYPE$\nHost: $HOSTNAME$\nState: $HOSTSTATE$\nAddress: $HOSTADDRESS$\nInfo: $HOSTOUTPUT$\n\nDate/ Time: $LONGDATETIME$\n" | /bin/mail -s "** $NOTIFICATIONTYPE$ Host Alert: $HOSTNAME$ is $HOSTSTATE$ **" $CONTACTEMAIL$ -- -f nagios@domain.com
and
/usr/bin/printf "%b" "***** Nagios *****\n\nNotification Type: $NOTIFICATIONTYPE$\n\nService: $SERVICEDESC$\nHost: $HOSTALIAS$\nAddress: $HOSTADDRESS$\nState: $SERVICESTATE $\n\nDate/Time: $LONGDATETIME$\n\nAdditional Info:\n\n$SERVICEOUTPUT$" | /bin/mail -s "** $NOTIFICATIONTYPE$ Service Alert: $HOSTALIAS$/$SERVICEDESC$ is $SERVICESTATE$ **" $CONTACTEMAIL$ -- -f nagios@domain.com
To explain it a little what we appended was a space followed by two dashes, which forces mail to pass those along to sendmail. Send mails sees the addition of a dash followed by the letter f and then another space and the e-mail address you want to send from.
On my system this is an alias for myself so that all replies come to my inbox.
All of this works on CentOS which is what I'm currently running. It should work on other distributions as well, but I haven't the time to verify that.
The change is very simple. Change the two command lines in your Nagios commands.cfg dealing with notify by e-mail. The command names are "notify-host-by-email" and "notify-service-by-email".
By default these lines read:
/usr/bin/printf "%b" "***** Nagios *****\n\nNotification Type: $NOTIFICATIONTYPE$\nHost: $HOSTNAME$\nState: $HOSTSTATE$\nAddress: $HOSTADDRESS$\nInfo: $HOSTOUTPUT$\n\nDate/ Time: $LONGDATETIME$\n" | /bin/mail -s "** $NOTIFICATIONTYPE$ Host Alert: $HOSTNAME$ is $HOSTSTATE$ **" $CONTACTEMAIL$
and
/usr/bin/printf "%b" "***** Nagios *****\n\nNotification Type: $NOTIFICATIONTYPE$\n\nService: $SERVICEDESC$\nHost: $HOSTALIAS$\nAddress: $HOSTADDRESS$\nState: $SERVICESTATE $\n\nDate/Time: $LONGDATETIME$\n\nAdditional Info:\n\n$SERVICEOUTPUT$" | /bin/mail -s "** $NOTIFICATIONTYPE$ Service Alert: $HOSTALIAS$/$SERVICEDESC$ is $SERVICESTATE$ **" $CONTACTEMAIL$
To change the from address you append " -- -f nagios@domain.com", that is without the quotes of course. So the new lines look like:
/usr/bin/printf "%b" "***** Nagios *****\n\nNotification Type: $NOTIFICATIONTYPE$\nHost: $HOSTNAME$\nState: $HOSTSTATE$\nAddress: $HOSTADDRESS$\nInfo: $HOSTOUTPUT$\n\nDate/ Time: $LONGDATETIME$\n" | /bin/mail -s "** $NOTIFICATIONTYPE$ Host Alert: $HOSTNAME$ is $HOSTSTATE$ **" $CONTACTEMAIL$ -- -f nagios@domain.com
and
/usr/bin/printf "%b" "***** Nagios *****\n\nNotification Type: $NOTIFICATIONTYPE$\n\nService: $SERVICEDESC$\nHost: $HOSTALIAS$\nAddress: $HOSTADDRESS$\nState: $SERVICESTATE $\n\nDate/Time: $LONGDATETIME$\n\nAdditional Info:\n\n$SERVICEOUTPUT$" | /bin/mail -s "** $NOTIFICATIONTYPE$ Service Alert: $HOSTALIAS$/$SERVICEDESC$ is $SERVICESTATE$ **" $CONTACTEMAIL$ -- -f nagios@domain.com
To explain it a little what we appended was a space followed by two dashes, which forces mail to pass those along to sendmail. Send mails sees the addition of a dash followed by the letter f and then another space and the e-mail address you want to send from.
On my system this is an alias for myself so that all replies come to my inbox.
All of this works on CentOS which is what I'm currently running. It should work on other distributions as well, but I haven't the time to verify that.
Tuesday, September 20, 2011
Powershell Get-ChildItem Count 1 result
This is going to be a quick one. I'm working on a new Powershell script (my second) and I'm doing some sanity checks before I actually try to continue the workflow.
If you run the command below and it returns only one item and then either try to print out $fileCount or run an if statement or something against it like if ($fileCount -gt 0){do some stuff} the "do some stuff" won't happen.
#$fileCount = $(get-childitem C:\ -filter *.zip).count
This is because the count method returns an array, which if only one item is in it doesn't get created and thus is 0. To get around this you must create the array first. You can do this in the same line of code as shown below.
#$fileCount = @(get-childitem C:\ -filter *.zip).count
The at sign there will create the array and you will have one item in it.
If you run the command below and it returns only one item and then either try to print out $fileCount or run an if statement or something against it like if ($fileCount -gt 0){do some stuff} the "do some stuff" won't happen.
#$fileCount = $(get-childitem C:\ -filter *.zip).count
This is because the count method returns an array, which if only one item is in it doesn't get created and thus is 0. To get around this you must create the array first. You can do this in the same line of code as shown below.
#$fileCount = @(get-childitem C:\ -filter *.zip).count
The at sign there will create the array and you will have one item in it.
Tuesday, September 13, 2011
File Checksum Integrity Verifier utility or SHA1 / MD5 checksum utility for Windows
On Linux if you need to verify the file you just downloaded is untouched you run either sha1sum or md5sum on the file to get the checksum and verify it against the published checksum. There are some utilities available for Windows, but today I'm going to point the spotlight at a Microsoft offering, File Checksum Integrity Verifier or fciv for short. You can grab the download from Microsoft's site.
There are a few options available when you run the command, such as -md5 to get the md5 checksum of a file or -sha1 to get the sha1 checksum of a file. But you can also use the -both flag to get both checksums of a given file. You can even create you own database of checksums to verify the files later.
To generate the checksums and store them in the database (xml file) run:
>fciv -both -xml fcdatabase.xml filetocheck.txt
The command above will obviously store both checksums and on a large file could take a while to run, as it needs to run twice on the file, once for the sha1 sum and once for the md5 sum. You of course can use one or the other check sum algorithm if you prefer (I prefer sha1 for the time being).
To later verify a file against the database you run the command shown below:
>fciv -sha1 -xml fcdatabase.xml filetocheck.txt
Now if you make changes to filetocheck.txt and run the command below you will see that verifying the file against the database it has changed. If this where an executable it may either be corrupt or compromised. If it was the project you've been working on for weeks, now is a good time to restore from backup, if the change wasn't expected of course.
>fciv -v -xml fcdatabase.xml filetocheck.txt
You'll see something like:
c:\users\mymcp\fcdatabase.xml
Hash is : 48a5967227b85c6805f3210832a155da
It should be : 04518689efadfdf2393b533dc9c7c8b5
My only real complaint is that fciv doesn't show any sort of progress while processing a large directory. It would be nice to see a file names flying by the screen or something. All in all though this is a tool worth checking out if you run Windows and don't have another tool already in your arsenal.
I would like to know if any of you have a tool in your arsenal already for this purpose and what it is / where I can find it. Sadly I don't recall any of the tools I've used in the past, but this one may become my tool of choice for this job.
There are a few options available when you run the command, such as -md5 to get the md5 checksum of a file or -sha1 to get the sha1 checksum of a file. But you can also use the -both flag to get both checksums of a given file. You can even create you own database of checksums to verify the files later.
To generate the checksums and store them in the database (xml file) run:
>fciv -both -xml fcdatabase.xml filetocheck.txt
The command above will obviously store both checksums and on a large file could take a while to run, as it needs to run twice on the file, once for the sha1 sum and once for the md5 sum. You of course can use one or the other check sum algorithm if you prefer (I prefer sha1 for the time being).
To later verify a file against the database you run the command shown below:
>fciv -sha1 -xml fcdatabase.xml filetocheck.txt
Now if you make changes to filetocheck.txt and run the command below you will see that verifying the file against the database it has changed. If this where an executable it may either be corrupt or compromised. If it was the project you've been working on for weeks, now is a good time to restore from backup, if the change wasn't expected of course.
>fciv -v -xml fcdatabase.xml filetocheck.txt
You'll see something like:
c:\users\mymcp\fcdatabase.xml
Hash is : 48a5967227b85c6805f3210832a155da
It should be : 04518689efadfdf2393b533dc9c7c8b5
My only real complaint is that fciv doesn't show any sort of progress while processing a large directory. It would be nice to see a file names flying by the screen or something. All in all though this is a tool worth checking out if you run Windows and don't have another tool already in your arsenal.
I would like to know if any of you have a tool in your arsenal already for this purpose and what it is / where I can find it. Sadly I don't recall any of the tools I've used in the past, but this one may become my tool of choice for this job.
Tuesday, April 12, 2011
Comparing ext3 to ext4 benchmarks
Below is the output from bonnie++, installed from rpmforge on CentOS 5.5, running against a RAID 0 (Linux Software RAID) of two Seagate Barracuda LP ST32000542AS, formatted with ext3.
#bonnie++ -d /mnt/SOMEDRIVE -n 32:64:4:4 -q | bon_csv2html > /StorageServer/RAID0.ext3.html


#bonnie++ -d /mnt/SOMEDRIVE -n 32:64:4:4 -q | bon_csv2html > /StorageServer/RAID0.ext3.html

Here is the same command but running on the same server, but this time running CentOS 5.6 with the same Linux software RAID 0 on two Seagate Barracuda LP ST32000542AS, but formatted with ext4.

We can see that Sequential Output Per Character is slightly higher, Block K/Sec is higher and with significantly lower latency, but Rewrite is lower and with higher latency on ext4. (Higher is better)
Sequential input on both Per Caharacter and Block K/Sec is also slightly higher and with lower latency on ext 4. Random seeks are also slightly higher on ext4. (Higher is better)
Sequential creates are higher, but require more CPU, while Sequential Reads are lower using about the same CPU. Sequential Deletes are also slower on ext4 than they where on ext3.
Where ext4 really seems to shine is on the Random Create section. Creating random files almost doubled per second on ext4 vs. ext3, all while using similar CPU. Random Reads where so fast on ext4 that I need to retest to get accurate results (shown by +++++ on the results). Random Deletes where about 25% faster on ext4 when compared to ext3 again while using less CPU, though not by much (1%).
Now these being benchmarks they give a nice indication about what kinds of performance I may be able to have, but I need to do real world testing. Hopefully I have some meaningful results after I finish upgrading all of my servers and filesystems. I will also benchmark our RAID 5 system before and after the conversion.
For our purposes it appears that ext4 is the better filesystem given our setup and procedures.
Sequential input on both Per Caharacter and Block K/Sec is also slightly higher and with lower latency on ext 4. Random seeks are also slightly higher on ext4. (Higher is better)
Sequential creates are higher, but require more CPU, while Sequential Reads are lower using about the same CPU. Sequential Deletes are also slower on ext4 than they where on ext3.
Where ext4 really seems to shine is on the Random Create section. Creating random files almost doubled per second on ext4 vs. ext3, all while using similar CPU. Random Reads where so fast on ext4 that I need to retest to get accurate results (shown by +++++ on the results). Random Deletes where about 25% faster on ext4 when compared to ext3 again while using less CPU, though not by much (1%).
Now these being benchmarks they give a nice indication about what kinds of performance I may be able to have, but I need to do real world testing. Hopefully I have some meaningful results after I finish upgrading all of my servers and filesystems. I will also benchmark our RAID 5 system before and after the conversion.
For our purposes it appears that ext4 is the better filesystem given our setup and procedures.
Monday, April 11, 2011
Converting an ext3 filesystem to ext4 on CentOS 5.6
If you recently installed CentOS 5.6 or updated to CentOS 5.6 you can now utilize the ext4 filesystem.
To do the conversion or create a new ext4 filesystem you need the e4fsprogs tool kit from yum.
#yum -y install e4fsprogs
I did this conversion on a test system with a non-root filesystem to avoid any possible problems. I also backed up the filesystem just in case something went terribly wrong.
First you need to un-mount the filesystem, as it cannot be in use.
#cd /; umount /dev/VolGroup00/LogVol00
Now you can run the tune4fs command to convert the filesystem to ext4.
#tune4fs -O extents,uninit_bg,dir_index /dev/VolGroup00/LogVol00
Now that the filesystem is ext4 it is no longer able to be mounted as ext3, so change its entry in the fstab.
#vi /etc/fstab
Now because we used the option uninit_bg we need to run fsck on the new ext4 filesystem. This is a good idea to do anyways, but is a requirement here.
#e4fsck -fDC0 /dev/VolGroup00/LogVol00
e4fsck will complain about "One or more block group descriptor checksums are invalid", this is totally normal.
Before doing these steps on the root filesystem (/) I would recommend you read over the Ext4 Howto on kernel.org. I re-wrote the steps for more accurate information pertaining specifically to CentOS 5.6 and my system.
As always:
THE INFORMATION IS DISTRIBUTED IN THE HOPE THAT IT WILL BE USEFUL, BUT WITHOUT ANY WARRANTY. IT IS PROVIDED "AS IS" WITHOUT WARRANTY OF ANY KIND, EITHER EXPRESSED OR IMPLIED, INCLUDING, BUT NOT LIMITED TO, THE IMPLIED WARRANTIES OF MERCHANTABILITY AND FITNESS FOR A PARTICULAR PURPOSE. THE ENTIRE RISK AS TO THE QUALITY AND PERFORMANCE OF THE PROGRAM IS WITH YOU. SHOULD THE INFORMATION PROVE DEFECTIVE, YOU ASSUME THE COST OF ALL NECESSARY SERVICING, REPAIR OR CORRECTION.
IN NO EVENT UNLESS REQUIRED BY APPLICABLE LAW THE AUTHOR WILL BE LIABLE TO YOU FOR DAMAGES, INCLUDING ANY GENERAL, SPECIAL, INCIDENTAL OR CONSEQUENTIAL DAMAGES ARISING OUT OF THE USE OR INABILITY TO USE THE PROGRAM (INCLUDING BUT NOT LIMITED TO LOSS OF DATA OR DATA BEING RENDERED INACCURATE OR LOSSES SUSTAINED BY YOU OR THIRD PARTIES OR A FAILURE OF THE INFORMATION TO OPERATE WITH ANY OTHER PROGRAMS), EVEN IF THE AUTHOR HAS BEEN ADVISED OF THE POSSIBILITY OF SUCH DAMAGES.
To do the conversion or create a new ext4 filesystem you need the e4fsprogs tool kit from yum.
#yum -y install e4fsprogs
I did this conversion on a test system with a non-root filesystem to avoid any possible problems. I also backed up the filesystem just in case something went terribly wrong.
First you need to un-mount the filesystem, as it cannot be in use.
#cd /; umount /dev/VolGroup00/LogVol00
Now you can run the tune4fs command to convert the filesystem to ext4.
#tune4fs -O extents,uninit_bg,dir_index /dev/VolGroup00/LogVol00
Now that the filesystem is ext4 it is no longer able to be mounted as ext3, so change its entry in the fstab.
#vi /etc/fstab
Now because we used the option uninit_bg we need to run fsck on the new ext4 filesystem. This is a good idea to do anyways, but is a requirement here.
#e4fsck -fDC0 /dev/VolGroup00/LogVol00
e4fsck will complain about "One or more block group descriptor checksums are invalid", this is totally normal.
Before doing these steps on the root filesystem (/) I would recommend you read over the Ext4 Howto on kernel.org. I re-wrote the steps for more accurate information pertaining specifically to CentOS 5.6 and my system.
As always:
THE INFORMATION IS DISTRIBUTED IN THE HOPE THAT IT WILL BE USEFUL, BUT WITHOUT ANY WARRANTY. IT IS PROVIDED "AS IS" WITHOUT WARRANTY OF ANY KIND, EITHER EXPRESSED OR IMPLIED, INCLUDING, BUT NOT LIMITED TO, THE IMPLIED WARRANTIES OF MERCHANTABILITY AND FITNESS FOR A PARTICULAR PURPOSE. THE ENTIRE RISK AS TO THE QUALITY AND PERFORMANCE OF THE PROGRAM IS WITH YOU. SHOULD THE INFORMATION PROVE DEFECTIVE, YOU ASSUME THE COST OF ALL NECESSARY SERVICING, REPAIR OR CORRECTION.
IN NO EVENT UNLESS REQUIRED BY APPLICABLE LAW THE AUTHOR WILL BE LIABLE TO YOU FOR DAMAGES, INCLUDING ANY GENERAL, SPECIAL, INCIDENTAL OR CONSEQUENTIAL DAMAGES ARISING OUT OF THE USE OR INABILITY TO USE THE PROGRAM (INCLUDING BUT NOT LIMITED TO LOSS OF DATA OR DATA BEING RENDERED INACCURATE OR LOSSES SUSTAINED BY YOU OR THIRD PARTIES OR A FAILURE OF THE INFORMATION TO OPERATE WITH ANY OTHER PROGRAMS), EVEN IF THE AUTHOR HAS BEEN ADVISED OF THE POSSIBILITY OF SUCH DAMAGES.
Thursday, March 03, 2011
Update to Promiscous Mode on vSphere 4
A few months back I wrote about Enabling Promiscuous Mode on vSphere 4. Well, I have learned some more since then. There isn't much information out there about recording a VoIP stream in a virtual machine environment. I hope to change that today.
First thing is first. If you are using VLANS on your physical network set your Virtual Machine Port Group to be a trunk. Also set the port on the physical switch to be a trunk instead of an access port.

Second thing, if you are using the E1000 NIC driver in your guest OS, turn off VLAN support. The screen shot is from Windows 2008 R2 64-bit, but it is similar in every other Windows OS.

Performance Best Practices for vSphere 4
First thing is first. If you are using VLANS on your physical network set your Virtual Machine Port Group to be a trunk. Also set the port on the physical switch to be a trunk instead of an access port.

Second thing, if you are using the E1000 NIC driver in your guest OS, turn off VLAN support. The screen shot is from Windows 2008 R2 64-bit, but it is similar in every other Windows OS.

Performance Best Practices for vSphere 4
NRPE: Unable to read output and sudo
Thank you to Andrea Leofreddi over at cyberz.org for the blog post Nagios nrpe and sudo: “NRPE: Unable to read output”. This was a tremendous help back when I first started working with my md-raid device and Nagios. I found this entry again while working on my very own plug-in for Nagios, check_supervisorctl.sh.
In short if you are running either CentOS or RHEL (5+ is all I have tested this with) you need to comment out the line "Defaults requiretty" in the /etc/sudoers file. In order to comment the line out simply add a hash symbol to the beginning of the line like so:
#Defaults requiretty
For the total noob, as I once was:
My command configurations:
command[check_raid]=sudo /usr/local/nagios/libexec/check_md_raid
command[check_supervisorctl]=sudo /usr/local/nagios/libexec/check_supervisorctl.sh
Both of the above lines are on a remote host from the nagios server. The checks are run via NRPE like so:
define service{
use generic-service
host_name
service_description RAID Status
check_command check_nrpe!check_raid
notifications_enabled 1
notification_period 24x7
notification_interval 15
notification_options c,w,u,r
}
define service{
use generic-service
host_name
service_description Supervisor Workers
check_command check_nrpe!check_supervisorctl
notifications_enabled 1
notification_period 24x7
notification_interval 30
}
Without "Defaults requiretty" commented out the output of my sudo command was simply:
NRPE: Unable to read output
But once I disabled requiretty I got the output I expected from my checks:
[root@hostname ~]# /usr/local/nagios/libexec/check_nrpe -H raid.hostname.local -c check_raid
RAID OK: All arrays OK [1 array checked]
[root@hostname ~]# /usr/local/nagios/libexec/check_nrpe -H hostname.local -c check_supervisorctl
OK: All of your programs are running!
In short if you are running either CentOS or RHEL (5+ is all I have tested this with) you need to comment out the line "Defaults requiretty" in the /etc/sudoers file. In order to comment the line out simply add a hash symbol to the beginning of the line like so:
#Defaults requiretty
For the total noob, as I once was:
My command configurations:
command[check_raid]=sudo /usr/local/nagios/libexec/check_md_raid
command[check_supervisorctl]=sudo /usr/local/nagios/libexec/check_supervisorctl.sh
Both of the above lines are on a remote host from the nagios server. The checks are run via NRPE like so:
define service{
use generic-service
host_name
service_description RAID Status
check_command check_nrpe!check_raid
notifications_enabled 1
notification_period 24x7
notification_interval 15
notification_options c,w,u,r
}
define service{
use generic-service
host_name
service_description Supervisor Workers
check_command check_nrpe!check_supervisorctl
notifications_enabled 1
notification_period 24x7
notification_interval 30
}
Without "Defaults requiretty" commented out the output of my sudo command was simply:
NRPE: Unable to read output
But once I disabled requiretty I got the output I expected from my checks:
[root@hostname ~]# /usr/local/nagios/libexec/check_nrpe -H raid.hostname.local -c check_raid
RAID OK: All arrays OK [1 array checked]
[root@hostname ~]# /usr/local/nagios/libexec/check_nrpe -H hostname.local -c check_supervisorctl
OK: All of your programs are running!
Wednesday, February 09, 2011
Strange Nagios Error Solved
This morning I added some new services to a server, but they wouldn't move out of "Pending" status. The error I received was
"Feb 9 09:27:36 nagios: Warning: Check result queue contained results for service '' on host '', but the service could not be found! Perhaps you forgot to define the service in your config files?"
I stopped the nagios service and ran ps -ef | grep nagios. To my surprise there was still a Nagios instance running. This means two things. First the init script that comes with Nagios is borked and doesn't correctly check for running nagios instances. Second, I somehow started a second Nagios instance.
I thought something was up in the first place because every other refresh or so of the Nagios web view I would either see the three pending services or I wouldn't. This was my first clue that something was borked. I then went to tail /var/log/messages and saw the error message. Then I started investigating the issue with the help of Google. Once I saw that there where two instances of Nagios things started to make sense.
I killed the second Nagios instance and any children processes (in my case ndo2db) and then restarted nagios via the init script.
Once I had everything up and running (but only one instance) I was able to successfully check my new services.
"Feb 9 09:27:36
I stopped the nagios service and ran ps -ef | grep nagios. To my surprise there was still a Nagios instance running. This means two things. First the init script that comes with Nagios is borked and doesn't correctly check for running nagios instances. Second, I somehow started a second Nagios instance.
I thought something was up in the first place because every other refresh or so of the Nagios web view I would either see the three pending services or I wouldn't. This was my first clue that something was borked. I then went to tail /var/log/messages and saw the error message. Then I started investigating the issue with the help of Google. Once I saw that there where two instances of Nagios things started to make sense.
I killed the second Nagios instance and any children processes (in my case ndo2db) and then restarted nagios via the init script.
Once I had everything up and running (but only one instance) I was able to successfully check my new services.
Thursday, December 30, 2010
ImageMagick convert -geometry weirdness
I don't know if this is really documented anywhere, but when using the ImageMagick program convert with the -geometry or -resize flags it also converts to 16bit color, at least when used against 1bit (Black and White) image.
The reason this is important to note is that using -compress Group4 will not work on these images because they aren't 1bit color images and they need to be. To work around this limitation you need to force the color depth with -monochrome. The downside to all of this is time.
Ripping an Image file from a PDF takes roughly .206 seconds for an 8.5x11 PDF with pdfimages (useful if a PDF has OCR embedded in it.)
Converting the resultant PBM file without -geometry 1700x2200! -monochrome takes roughly .194 seconds.
Converting the resultant PBM file with -geometry 1700x2200! -monochrome takes roughly 4.594 seconds. This is an increase of 10 - 10.5 % adding in the geometry.
*all of the above numbers are from one file, but testing of different files showed similar results. All tests where done at 200 DPI.
Here are some examples of the commands we are running for anyone curious.
convert ${outputTiffRoot}-000.p*m -density 200 -compress Group4 {outputTiffRoot}_200.tiff
convert ${outputTiffRoot}-000.p*m -density 300 -compress Group4 {outputTiffRoot}_200.tiff
convert ${outputTiffRoot}-000.p*m -density 200 -compress Group4 -geometry 1700x2200! -monochrome ${outputTiffRoot}_200.tiff
convert ${outputTiffRoot}-000.p*m -density 300 -compress Group4 -geometry 2550x3300! -monochrome ${outputTiffRoot}_300.tiff
The reason this is important to note is that using -compress Group4 will not work on these images because they aren't 1bit color images and they need to be. To work around this limitation you need to force the color depth with -monochrome. The downside to all of this is time.
Ripping an Image file from a PDF takes roughly .206 seconds for an 8.5x11 PDF with pdfimages (useful if a PDF has OCR embedded in it.)
Converting the resultant PBM file without -geometry 1700x2200! -monochrome takes roughly .194 seconds.
Converting the resultant PBM file with -geometry 1700x2200! -monochrome takes roughly 4.594 seconds. This is an increase of 10 - 10.5 % adding in the geometry.
*all of the above numbers are from one file, but testing of different files showed similar results. All tests where done at 200 DPI.
Here are some examples of the commands we are running for anyone curious.
convert ${outputTiffRoot}-000.p*m -density 200 -compress Group4 {outputTiffRoot}_200.tiff
convert ${outputTiffRoot}-000.p*m -density 300 -compress Group4 {outputTiffRoot}_200.tiff
convert ${outputTiffRoot}-000.p*m -density 200 -compress Group4 -geometry 1700x2200! -monochrome ${outputTiffRoot}_200.tiff
convert ${outputTiffRoot}-000.p*m -density 300 -compress Group4 -geometry 2550x3300! -monochrome ${outputTiffRoot}_300.tiff
Thursday, October 14, 2010
Enabling Promiscuous Mode on vSphere 4
We are in desperate need of a testing server. The testing server needs to be able to listen to the network, through port mirroring, to record VoIP calls. In the physical world this is no problem, but we don't have the budget for another physical box, especially for something as non-critical as testing a program upgrade (even though the program it self is very critical to our business).
A year ago the software vendor said that they don't support virtual environments and their product doesn't work in a virtual environment. During discussions this year however they told the truth that they simply don't know if it will work, and thus "don't support" it. I am calling it lazy. It doesn't take much these days to get a VM host going and configured for testing things out.
Well we have done the leg work for them. I have confirmed that vSphere does allow for promiscuous mode, even from the physical network. To be honest I was a little shocked to see this worked.
Here are the steps to enable promiscuous mode on your vSphere host and the guest VM.
We enable promiscuous mode on the virtual adapter by logging into the vSphere Client, going to the VM Host, clicking on the "Configuration" tab, then on "Networking" in the "Hardware" section on the left. Now click on "Properties..." for the Virtual Switch.

Now enabling promiscuous mode on the vSwitch is pretty simple. Click on the "vSwitch" on the "Ports" tab, as shown below and then click on the "Edit..." button.

Now that we are editing the vSwitch properties click on the "Security" tab. Change the option for Promiscuous mode to "Accept" if it isn't already and hit "OK".

To enable promiscuous mode for the guest we need to break down to the command line. I used putty to SSH into my vSphere host, which I had previously setup. Now you need to edit the .vmx file of the guest that will be listening to the network.
# vi /vmfs/volumes/datastore1/testServer/testServer.vmx
I did a search for ethernet, so the promiscuous mode configuration would be with the rest of the ethernet config. Add the following line to the configuration file:
ethernet0.noPromisc = "FALSE"

And save when you are done. I rebooted my testServer just as a precaution, but I'm not certain it is required.
At this point everything is configured on the VM side of things. Make sure you have port mirroring enabled on your physical switch and give it a test. In my environment I commonly use Wireshark. I did my testing by pinging a server on a mirrored port.

A year ago the software vendor said that they don't support virtual environments and their product doesn't work in a virtual environment. During discussions this year however they told the truth that they simply don't know if it will work, and thus "don't support" it. I am calling it lazy. It doesn't take much these days to get a VM host going and configured for testing things out.
Well we have done the leg work for them. I have confirmed that vSphere does allow for promiscuous mode, even from the physical network. To be honest I was a little shocked to see this worked.
Here are the steps to enable promiscuous mode on your vSphere host and the guest VM.
- Enable promiscuous mode on the virtual adapter.
- Enable promiscuous mode on the vSwitch.
- Enable promiscuous mode for the guest.
- Enable port mirroring on the physical switch (not covered here).
- Test capturing network data.
We enable promiscuous mode on the virtual adapter by logging into the vSphere Client, going to the VM Host, clicking on the "Configuration" tab, then on "Networking" in the "Hardware" section on the left. Now click on "Properties..." for the Virtual Switch.

Now enabling promiscuous mode on the vSwitch is pretty simple. Click on the "vSwitch" on the "Ports" tab, as shown below and then click on the "Edit..." button.

Now that we are editing the vSwitch properties click on the "Security" tab. Change the option for Promiscuous mode to "Accept" if it isn't already and hit "OK".

To enable promiscuous mode for the guest we need to break down to the command line. I used putty to SSH into my vSphere host, which I had previously setup. Now you need to edit the .vmx file of the guest that will be listening to the network.
# vi /vmfs/volumes/datastore1/testServer/testServer.vmx
I did a search for ethernet, so the promiscuous mode configuration would be with the rest of the ethernet config. Add the following line to the configuration file:
ethernet0.noPromisc = "FALSE"

And save when you are done. I rebooted my testServer just as a precaution, but I'm not certain it is required.
At this point everything is configured on the VM side of things. Make sure you have port mirroring enabled on your physical switch and give it a test. In my environment I commonly use Wireshark. I did my testing by pinging a server on a mirrored port.
Using PSExec to Defragment your PCs
Way back in 2000 / 2001 I was an IT intern. My job was to do the really manual processes for a small department with in a much larger company. One of those was monthly defrags of all PCs and Laptops (if they where available). I had to go to each and every PC, log on, and start the defrag process manually. I believe this to be my first moment of "I should automate this". Problem was I didn't know how or really where to start. I knew script was the answer, but just couldn't get things to work. I believe I eventually created a scheduled task on each machine (by hand) to do this for us.
Fast forward 10 years and I am still in need of the same thing, as we don't have Vista or Windows 7 deployed. But now I have a much better understanding of what needs to happen and even better I know where to start!
PSExec, which is part of the System Internals PsTools suite is my answer these days. A simple script, run from my PC (still manually for the time being) is able to handle defragmenting all of our PCs.
psexec @C:\Updates\Comps\AppPCs.txt -n 10 -c -f -d JkDefragCMD.exe
I use the files with PC names to speed up re-deployment of everything. The -n 10 flag tells psexec t0 wait 10 seconds before it times out the PC, instead of 60 (I believe this is the default). -c copies the file (jkdefragcmd.exe) to the remote system. The flag -f forces copying, even if the file exists. The flag -d doesn't wait for the process to terminate, this is as asynchronously as I can do.
My next step is to hook this up to task scheduler and have it run the first Sunday or something.
Fast forward 10 years and I am still in need of the same thing, as we don't have Vista or Windows 7 deployed. But now I have a much better understanding of what needs to happen and even better I know where to start!
PSExec, which is part of the System Internals PsTools suite is my answer these days. A simple script, run from my PC (still manually for the time being) is able to handle defragmenting all of our PCs.
psexec @C:\Updates\Comps\AppPCs.txt -n 10 -c -f -d JkDefragCMD.exe
I use the files with PC names to speed up re-deployment of everything. The -n 10 flag tells psexec t0 wait 10 seconds before it times out the PC, instead of 60 (I believe this is the default). -c copies the file (jkdefragcmd.exe) to the remote system. The flag -f forces copying, even if the file exists. The flag -d doesn't wait for the process to terminate, this is as asynchronously as I can do.
My next step is to hook this up to task scheduler and have it run the first Sunday or something.
Monday, October 04, 2010
Enabling the Administrator user in Windows 7
This is a very simple fix. The reasons to actually log on as the administrator are shrinking, but for my environment I need to log on as the Administrator user occasionally (for software patching).
- Open up a command prompt as Administrator (not the same thing we are trying to do)
- Run "net user /active:yes administrator"
- Now it is a great idea to set a password for the Administrator user so we can do that right now
- Run "net user administrator password" but replace password with something more complex similar to "Som3C0mpl3xP@$$w0rd"
- Exit out of the command prompt.
Enabling Ping responses in Windows 7
Out of the box if you Ping a Windows 7 host you will recieve "Request Timed Out". This is because the Windows 7 firewall is blocking ICMP echo requests. If this is causing you problems and you need to open up access to ping requests it is fairly simple.
- Go to the "Windows Firewall" in the Control Panel.
- On the left hand side click "Advanced Settings"
- Click on "Inbound Rules"
- Right click on "Inbound Rules" and choose "New Rule"
- Select "Custom (Custom Rule)" and press "Next"
- Select the (default) "All Programs" and press "Next"
- Change the Protocol type from "Any" to "ICMPv4"
- Unless you want to restrict the ping response choose the option "Any IP address". (This is for your adapter.)
- Unless you want to restrict which hosts can ping you choose "Any IP address".
- On the Action screen ensure it is an "Allowed" connection.
- Leave all three check boxes check on the Profile screen.
- On the final screen, Name, give it a meaningful name such as "Echo Ping Request"
- Finally click finish.
Monday, September 13, 2010
How to Reset the Password(s) on a Linksys SRW248G4 Switch
- Connect to the Serial port on the back of the switch with a serial cable. (Putty on Windows works well)
- The defaults for connecting to the serial port are 38400 baud, 8 data bits, no parity, 1 stop bit, no flow control.
- Confirm that you have an active serial connection by pressing enter a couple of times. You should receive a login screen
- Once you have successfully connected to the serial port restart the switch by unplugging the power. (Either from back or from the power strip, my preferred method is the back)
- The switch will start its POST process.
- Look for the line “Autoboot in 2 seconds - press RETURN or Esc. to abort and enter prom.” (Please note: Do not hold down Esc. or Enter. Only press it once.)
- You will know that you interrupted the boot sequence when you are prompted with a startup menu. Select option 3 “Password Recovery Procedure”.
- The screen will display “The current password will be ignored!”. Press Enter to reboot the switch.
- Once the switch has restarted login with the default admin user and no password. This will work on either the terminal or the web interface. Proceed to create / modify users and passwords. This does not reset the rest of the configuration, just user accounts.
- Once you have your new credentials reboot the switch again. Document the credentials.
- Verify that your new credentials work by logging into either the web interface for the command line interface.
- Disconnect the cable and store it safely.
Thursday, August 19, 2010
Rebuilding the Icon Cache in Windows 7 (and Vista)
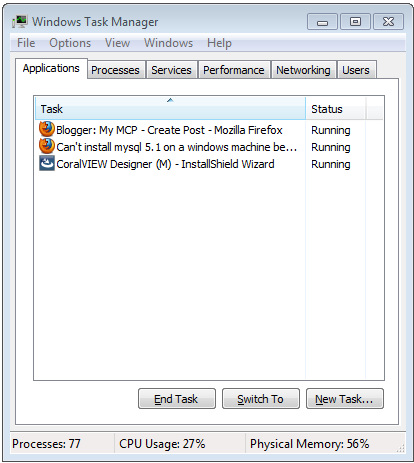
If you ever need to rebuild the Icon Cache and dearly miss TweakUI for this duty there are three simple command lines to run and a process to kill and then start.
1. Open Task Manager
2. Kill all explorer.exe processes (but leave Task Manager Open)
3. Open a command prompt
4. type "CD /d %userprofile%\AppData\Local"
5. type "DEL IconCache.db /a"
6. type "Exit"
7. Go to Applications Tab in Task Manager and click the "New Task..." button.
8. type "explorer.exe"
1. Open Task Manager
2. Kill all explorer.exe processes (but leave Task Manager Open)
3. Open a command prompt
4. type "CD /d %userprofile%\AppData\Local"
5. type "DEL IconCache.db /a"
6. type "Exit"
7. Go to Applications Tab in Task Manager and click the "New Task..." button.
8. type "explorer.exe"
How to Enable Windows 7 GodMode
God mode in Windows 7 is similar to TweakUI in Windows XP, but is really simple to setup and requires no installation.
1. Create a new folder.
2. GodMode windowRename the folder to
GodMode.{ED7BA470-8E54-465E-825C-99712043E01C}
(note that you can change the “GodMode” text, but the following period and code number are required).
I create this folder in my home directory.
1. Create a new folder.
2. GodMode windowRename the folder to
GodMode.{ED7BA470-8E54-465E-825C-99712043E01C}
(note that you can change the “GodMode” text, but the following period and code number are required).
I create this folder in my home directory.
Monday, July 26, 2010
Installing Backup Exec System Restore on CentOS 5.5 and First backup / restore
As I said in my review I would telling you how to install this on CentOS 5.5, so here it is.
Normally one would simply run the Symantec_Backup_Exec_System_Recovery.bin with ./Symantec_Backup_Exec_System_Recovery.bin. But on a non-supported distribution / kernel that won't work.
However all is not lost! You can install this with a little shell-fu.
Instead of ./Symantec_Backup_Exec_System_Recovery.bin run
./Symantec_Backup_Exec_System_Recovery.bin --noexec --target .
This will extract the contents of the binary to the current directory. Next you need to install a few RPM packages, but you need to know what version of kernel you are running (for me it was either PAE or non-PAE). So I ran uname -a to see what version of the kernel that machine was running.
rpm -Uhv SymSnap/symbdsnap-1.0.1-36146.2.6.18_8.el5PAE.i686.rpm
rpm -Uhv symmount-1.0.1-36352.i686.rpm
rpm -Uhv besr-1.0.1-36352.i686.rpm
Once all of these packages are installed I was able to do my first backup. And by first backup I mean first three (/boot, /, and SWAP). While I probably don't need to do all three (/boot and /) I don't want to have to create a SWAP system after a restore. So I ran all three.
besr -b/dev/sda1 -d /Storage/backups/hostname/boot.v2i -use-aes-encryption standard -p SoM3SupErSecureP@ssW0rd -compress Standard
besr -b /dev/mapper/VolGroup00-LogVol00 -d /Storage/backups/hostname/Vol00Log00.v2i -use-aes-encryption standard -p SoM3SupErSecureP@ssW0rd -compress Standard
besr -b /dev/mapper/VolGroup00-LogVol01 -d /Storage/backups/hostname/Vol00Log01.v2i -use-aes-encryption standard -p SoM3SupErSecureP@ssW0rd -compress Standard
Now in /Storage/backups/hostname I have three files
boot.v2i
Vol00Log00.v2i
Vol00Log01.v2i
If I needed to restore these I would use the Backup Exec System Recovery Windows based LiveCD. During the restore I would choose all three of these in the order shown above.
After the restore process was finished I need to boot using the gparted LiveCD. Once in I would open up a terminal and install grub on to my sda hard drive.
#grub
#root (hd0,0)
#setup (hd0)
#quit
Once grub is installed on sda I needed to update fstab to no longer look for / on the /dev/mapper/VolGroup00-LogVol00 and swap to not be on /dev/mapper/VolGroup00-LogVol01.
Normally one would simply run the Symantec_Backup_Exec_System_Recovery.bin with ./Symantec_Backup_Exec_System_Recovery.bin. But on a non-supported distribution / kernel that won't work.
However all is not lost! You can install this with a little shell-fu.
Instead of ./Symantec_Backup_Exec_System_Recovery.bin run
./Symantec_Backup_Exec_System_Recovery.bin --noexec --target .
This will extract the contents of the binary to the current directory. Next you need to install a few RPM packages, but you need to know what version of kernel you are running (for me it was either PAE or non-PAE). So I ran uname -a to see what version of the kernel that machine was running.
rpm -Uhv SymSnap/symbdsnap-1.0.1-36146.2.6.18_8.el5PAE.i686.rpm
rpm -Uhv symmount-1.0.1-36352.i686.rpm
rpm -Uhv besr-1.0.1-36352.i686.rpm
Once all of these packages are installed I was able to do my first backup. And by first backup I mean first three (/boot, /, and SWAP). While I probably don't need to do all three (/boot and /) I don't want to have to create a SWAP system after a restore. So I ran all three.
besr -b/dev/sda1 -d /Storage/backups/hostname/boot.v2i -use-aes-encryption standard -p SoM3SupErSecureP@ssW0rd -compress Standard
besr -b /dev/mapper/VolGroup00-LogVol00 -d /Storage/backups/hostname/Vol00Log00.v2i -use-aes-encryption standard -p SoM3SupErSecureP@ssW0rd -compress Standard
besr -b /dev/mapper/VolGroup00-LogVol01 -d /Storage/backups/hostname/Vol00Log01.v2i -use-aes-encryption standard -p SoM3SupErSecureP@ssW0rd -compress Standard
Now in /Storage/backups/hostname I have three files
boot.v2i
Vol00Log00.v2i
Vol00Log01.v2i
If I needed to restore these I would use the Backup Exec System Recovery Windows based LiveCD. During the restore I would choose all three of these in the order shown above.
After the restore process was finished I need to boot using the gparted LiveCD. Once in I would open up a terminal and install grub on to my sda hard drive.
#grub
#root (hd0,0)
#setup (hd0)
#quit
Once grub is installed on sda I needed to update fstab to no longer look for / on the /dev/mapper/VolGroup00-LogVol00 and swap to not be on /dev/mapper/VolGroup00-LogVol01.
Backup Exec System Recovery Review
I asked a question over on Serverfault about backup software that supported Windows and Linux and did Bare-Metal Recovery and the response I got was to try Backup Exec System Recovery, which so far has been pretty good.
The bad stuff:
1) Restore CD creation on CentOS is impossible from what I have tried and can tell. They really do mean Redhat Enterprise Linux only.
2) Bare-metal recovery with MBR restore doesn't work. Which means I have to install grub after a restore.
3) LVM support is once again not there or well hidden.
4) Centralized management. It is a separate 1GB download as an Addon. I did the download and install, but now I can't find the Management console. Setting up each of our servers isn't too big of a problem, but I really wanted one window to view for backups.
5) There is no built in scheduler with Linux.
6) There is no incremental backup in Linux.
The good stuff:
1) It works on CentOS with a little bit of hacker-y to install (more on that in another post).
2) It is easy to install and configure on Windows, even though it requires a reboot. (BOO!)
3) It is pretty quick to get a backup started.
4) The backup procedure is different on Windows than on Linux. Windows is GUI based 100%. (I haven't looked to see if I can configure a backup from the command line.) While Linux is 100% CLI.
5) The Windows based restore CD is a pretty useful tool with out limits (unlike the Acronis Boot Disk).
6)Restores are quick and pretty simple to do.
All in all after trying three different products and looking at half a dozen I think this may be the winner.
CHECK_NRPE: Error - Could not complete SSL handshake
Recently I have been auditing our servers versus what we check in nagios versus what we need to do when a system is rebooted during routine maintenance. I found that two of our servers have been left out of nagios monitoring even though they are on my maintenance checklist, and they have software that I still start by hand (I KNOW IT'S NOT A BEST PRACTICE!).
Both servers had NRPE installed and configured (mostly), one of them even had a configuration file on the nagios server but it wasn't enabled (hostname.disabled instead of hostname.cfg). The other server needed a configuration file, but even then it wasn't working, so here are my troubleshooting steps:
1) Check to see that NRPE is compiled and installed. [It was]
2) Check that NRPE was listening (netstat -an | grep 5666) [It was]
3) Check that NRPE was listed in /etc/services [It wasn't]
4) Check the NRPE config file (/etc/xinetd.d/nrpe) for "only_from = 127.0.0.1 192.168.100.31" [It wasn't]
So I added the service definition to /etc/services and the nagios server IP to the only from line and restarted xinetd (service xinetd restart) and I was finally able to connect from my nagios server.
All of this is on CentOS 5.5 for both the server and the client.
Both servers had NRPE installed and configured (mostly), one of them even had a configuration file on the nagios server but it wasn't enabled (hostname.disabled instead of hostname.cfg). The other server needed a configuration file, but even then it wasn't working, so here are my troubleshooting steps:
1) Check to see that NRPE is compiled and installed. [It was]
2) Check that NRPE was listening (netstat -an | grep 5666) [It was]
3) Check that NRPE was listed in /etc/services [It wasn't]
4) Check the NRPE config file (/etc/xinetd.d/nrpe) for "only_from = 127.0.0.1 192.168.100.31" [It wasn't]
So I added the service definition to /etc/services and the nagios server IP to the only from line and restarted xinetd (service xinetd restart) and I was finally able to connect from my nagios server.
All of this is on CentOS 5.5 for both the server and the client.
Subscribe to:
Posts (Atom)