This is going to be a quick one. I'm working on a new Powershell script (my second) and I'm doing some sanity checks before I actually try to continue the workflow.
If you run the command below and it returns only one item and then either try to print out $fileCount or run an if statement or something against it like if ($fileCount -gt 0){do some stuff} the "do some stuff" won't happen.
#$fileCount = $(get-childitem C:\ -filter *.zip).count
This is because the count method returns an array, which if only one item is in it doesn't get created and thus is 0. To get around this you must create the array first. You can do this in the same line of code as shown below.
#$fileCount = @(get-childitem C:\ -filter *.zip).count
The at sign there will create the array and you will have one item in it.
Showing posts with label Windows Vista. Show all posts
Showing posts with label Windows Vista. Show all posts
Tuesday, September 20, 2011


Tuesday, September 13, 2011
File Checksum Integrity Verifier utility or SHA1 / MD5 checksum utility for Windows
On Linux if you need to verify the file you just downloaded is untouched you run either sha1sum or md5sum on the file to get the checksum and verify it against the published checksum. There are some utilities available for Windows, but today I'm going to point the spotlight at a Microsoft offering, File Checksum Integrity Verifier or fciv for short. You can grab the download from Microsoft's site.
There are a few options available when you run the command, such as -md5 to get the md5 checksum of a file or -sha1 to get the sha1 checksum of a file. But you can also use the -both flag to get both checksums of a given file. You can even create you own database of checksums to verify the files later.
To generate the checksums and store them in the database (xml file) run:
>fciv -both -xml fcdatabase.xml filetocheck.txt
The command above will obviously store both checksums and on a large file could take a while to run, as it needs to run twice on the file, once for the sha1 sum and once for the md5 sum. You of course can use one or the other check sum algorithm if you prefer (I prefer sha1 for the time being).
To later verify a file against the database you run the command shown below:
>fciv -sha1 -xml fcdatabase.xml filetocheck.txt
Now if you make changes to filetocheck.txt and run the command below you will see that verifying the file against the database it has changed. If this where an executable it may either be corrupt or compromised. If it was the project you've been working on for weeks, now is a good time to restore from backup, if the change wasn't expected of course.
>fciv -v -xml fcdatabase.xml filetocheck.txt
You'll see something like:
c:\users\mymcp\fcdatabase.xml
Hash is : 48a5967227b85c6805f3210832a155da
It should be : 04518689efadfdf2393b533dc9c7c8b5
My only real complaint is that fciv doesn't show any sort of progress while processing a large directory. It would be nice to see a file names flying by the screen or something. All in all though this is a tool worth checking out if you run Windows and don't have another tool already in your arsenal.
I would like to know if any of you have a tool in your arsenal already for this purpose and what it is / where I can find it. Sadly I don't recall any of the tools I've used in the past, but this one may become my tool of choice for this job.
There are a few options available when you run the command, such as -md5 to get the md5 checksum of a file or -sha1 to get the sha1 checksum of a file. But you can also use the -both flag to get both checksums of a given file. You can even create you own database of checksums to verify the files later.
To generate the checksums and store them in the database (xml file) run:
>fciv -both -xml fcdatabase.xml filetocheck.txt
The command above will obviously store both checksums and on a large file could take a while to run, as it needs to run twice on the file, once for the sha1 sum and once for the md5 sum. You of course can use one or the other check sum algorithm if you prefer (I prefer sha1 for the time being).
To later verify a file against the database you run the command shown below:
>fciv -sha1 -xml fcdatabase.xml filetocheck.txt
Now if you make changes to filetocheck.txt and run the command below you will see that verifying the file against the database it has changed. If this where an executable it may either be corrupt or compromised. If it was the project you've been working on for weeks, now is a good time to restore from backup, if the change wasn't expected of course.
>fciv -v -xml fcdatabase.xml filetocheck.txt
You'll see something like:
c:\users\mymcp\fcdatabase.xml
Hash is : 48a5967227b85c6805f3210832a155da
It should be : 04518689efadfdf2393b533dc9c7c8b5
My only real complaint is that fciv doesn't show any sort of progress while processing a large directory. It would be nice to see a file names flying by the screen or something. All in all though this is a tool worth checking out if you run Windows and don't have another tool already in your arsenal.
I would like to know if any of you have a tool in your arsenal already for this purpose and what it is / where I can find it. Sadly I don't recall any of the tools I've used in the past, but this one may become my tool of choice for this job.
Thursday, August 19, 2010
Rebuilding the Icon Cache in Windows 7 (and Vista)
If you ever need to rebuild the Icon Cache and dearly miss TweakUI for this duty there are three simple command lines to run and a process to kill and then start.
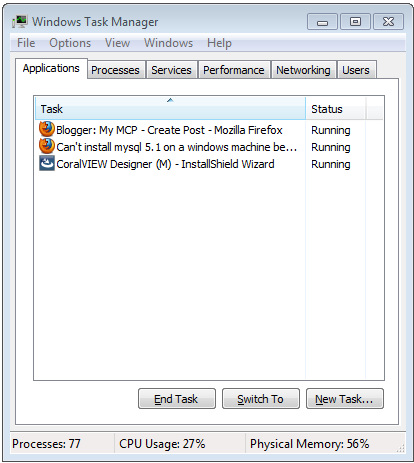
1. Open Task Manager
2. Kill all explorer.exe processes (but leave Task Manager Open)
3. Open a command prompt
4. type "CD /d %userprofile%\AppData\Local"
5. type "DEL IconCache.db /a"
6. type "Exit"
7. Go to Applications Tab in Task Manager and click the "New Task..." button.
8. type "explorer.exe"
1. Open Task Manager
2. Kill all explorer.exe processes (but leave Task Manager Open)
3. Open a command prompt
4. type "CD /d %userprofile%\AppData\Local"
5. type "DEL IconCache.db /a"
6. type "Exit"
7. Go to Applications Tab in Task Manager and click the "New Task..." button.
8. type "explorer.exe"
Wednesday, August 11, 2010
Fixing Adobe Error 148:3 Licensing for this product has stopped working
This is a pretty simple fix. Go over to Adobe's Licensing website and download the License Recovery tool. Run it and follow the prompts.
Before this I had wanted to Repair my installation and went to the Control Panel, but my only option was to uninstall the suite and re-install, so I knew there had to be a simpler way to do it and there was!
Before this I had wanted to Repair my installation and went to the Control Panel, but my only option was to uninstall the suite and re-install, so I knew there had to be a simpler way to do it and there was!
Wednesday, April 07, 2010
Helpful Tech Support!
I don't often gush about good experiences, but I recently had an issue with Spiceworks, which ended up being a configuration problem on my end. Not only did the Support Engineer help me with my issue but they also saw another configuration issue and made some recommendations on how to fix it. Additionally they told me about a bug in the software that I was not aware of that has been affecting the performance!
Also the support rep was able to do all of this and not make me feel like an idiot!
TL;DR
Had a problem. It was fixed. Also fixed two other issues I didn't know I had!
Also the support rep was able to do all of this and not make me feel like an idiot!
TL;DR
Had a problem. It was fixed. Also fixed two other issues I didn't know I had!
Friday, June 26, 2009
Installing VirtualBox machine Additions on CentOS 5.1 - 5.3
For a few weeks now I have been creating a VirtualBox VM for a demo server. The purpose is to give our sales staff a way to bring our technology to the client and show them, in a live environment how our systems works, even if they don't have an Internet connection available.
I have been working on this system in a ridicously small screen for a little while now and finally got sick of it. I had tried installing the Virtual Machine additions before, but it failed for one reason or another. This time around I was determined to get everything up and running properly, so A) I wouldn't have to work on such a small screen and B) I could just move my mouse between the VM and my Desktop with out hitting a button.
Anyways, on to the meat of this, how to install the pre-requsite libraries and the Virtual Machine additons on CentOS. Now I just did this on a CentOS 5.3 install, but it has reportidly worked as far back as 5.1.
First you need to install the kernel sources and gcc, if you don't already have them.
yum isntall -y gcc
yum install -y kernel sources kernel-devel
Then you need to create a symbolic link to the kernel source:
ln -s /usr/src/kernels/2.6.18-92.1.18.el5-i686 /usr/src/linux
After this it is best to reboot the machine:
shutdown -r now
Once the machine has come back online you can mount the Guest additions ISO and install them via one of two commands depending on your architecture:
sh VBoxLinuxAdditions-x86.run
or
sh VBoxLinuxAddtions-amd64.run
After either of these commands are run you will have to once again reboot the Virtual Machine:
shutdown -r now
After the reboot you should be able to move the mouse between the VM and you Host OS without unlocking it and any of the other nifty features the Guest additions add.
I have been working on this system in a ridicously small screen for a little while now and finally got sick of it. I had tried installing the Virtual Machine additions before, but it failed for one reason or another. This time around I was determined to get everything up and running properly, so A) I wouldn't have to work on such a small screen and B) I could just move my mouse between the VM and my Desktop with out hitting a button.
Anyways, on to the meat of this, how to install the pre-requsite libraries and the Virtual Machine additons on CentOS. Now I just did this on a CentOS 5.3 install, but it has reportidly worked as far back as 5.1.
First you need to install the kernel sources and gcc, if you don't already have them.
yum isntall -y gcc
yum install -y kernel sources kernel-devel
Then you need to create a symbolic link to the kernel source:
ln -s /usr/src/kernels/2.6.18-92.1.18.el5-i686 /usr/src/linux
After this it is best to reboot the machine:
shutdown -r now
Once the machine has come back online you can mount the Guest additions ISO and install them via one of two commands depending on your architecture:
sh VBoxLinuxAdditions-x86.run
or
sh VBoxLinuxAddtions-amd64.run
After either of these commands are run you will have to once again reboot the Virtual Machine:
shutdown -r now
After the reboot you should be able to move the mouse between the VM and you Host OS without unlocking it and any of the other nifty features the Guest additions add.
Friday, May 22, 2009
A simple file shredder for Windows
Working with sensitive data all day long you come to realize that what I download needs to be deleted securely, just as the paper copies need to destroyed securely.
I happened upon this script on Lifehacker a while ago, but I have been using it more and more lately.
First you will need to download sdelete from Microsoft. I copy this exe to the Windows directory on each machine as part of my install process.
The script if very simple:
@echo off
FOR %%F IN (%1 %2 %3 %4 %5 %6 %7 %8 %9 %10) DO sdelete -p 7 -s %%F
I save this as shred.cmd and place it in my C:\Scripts folder. It will take up to 10 files at a time and run sdelete with 7 passes on each file. Sdelete will also rename the file 26 times to obfuscate the file name.
About once a month I will run sdelete -p 3 -z to clean the free space on my PC and to make sure that any temp files I didn't shred are cleaned up. Now this won't obfuscate the file names at all, but the contents of the files are gone for good.
You can also place a short cut to the shred.cmd file into your Send To menu options and have an easy way to clean files from any folder.
I happened upon this script on Lifehacker a while ago, but I have been using it more and more lately.
First you will need to download sdelete from Microsoft. I copy this exe to the Windows directory on each machine as part of my install process.
The script if very simple:
@echo off
FOR %%F IN (%1 %2 %3 %4 %5 %6 %7 %8 %9 %10) DO sdelete -p 7 -s %%F
I save this as shred.cmd and place it in my C:\Scripts folder. It will take up to 10 files at a time and run sdelete with 7 passes on each file. Sdelete will also rename the file 26 times to obfuscate the file name.
About once a month I will run sdelete -p 3 -z to clean the free space on my PC and to make sure that any temp files I didn't shred are cleaned up. Now this won't obfuscate the file names at all, but the contents of the files are gone for good.
You can also place a short cut to the shred.cmd file into your Send To menu options and have an easy way to clean files from any folder.
Adding programs to the "Send To" menu
From time to time I write small scripts that accept Command line arguments. In the past I kept shortcuts to them on my desktop, but today I wanted to remove all icons from my desktop.
If you open up %APPDATA%\Microsoft\Windows\SendTo in Windows Explorer.
Let's say you wanted to add an item to the Send To menu to shred files with sdelete. You could just drag a shortcut to the shred script this folder, or create a new shortcut.
If you open up %APPDATA%\Microsoft\Windows\SendTo in Windows Explorer.
You see %APPDATA% is an environment variable that usually maps to something like C:\Documents and Settings\[YOUR USER PROFILE]\Application Data\ in Windows 2000/XP and "C:\Users\[YOUR USER PROFILE]\Application Data\" in Windows Vista.
Let's say you wanted to add an item to the Send To menu to shred files with sdelete. You could just drag a shortcut to the shred script this folder, or create a new shortcut.
This method should work for any application that allows you to open a file by using a command line argument.
Friday, January 23, 2009
Things learned over time, Part 1
This is going to be an on going series of quick posts. Some of those quick little tid bits of information that once you know you never forget, but up until that point it makes things harder than they need to be.
I typically change directories to where I want files to end up if say I am using wget or xcopy. I used to do xcopy z:\some\directory\* c:\Users\Steve\Desktop\Directory
now I have either realized or learnd from someone that you can do
xcopy z:\some\directory\* .
Saves a lot of typing and reduces mistakes. Again you have to be in the directory for it to work.
Alternatively if you open a command prompt by default you are in your home directory, so if I wanted the same outcome but didn't want to change directories I would do
xcopy z:\some\directory Desktop\Directory
Of course this works on Linux as well as Windows but the paths and slashes will be different.
Wednesday, January 14, 2009
Spiceworks releases 3.5!
Just found out that Spiceworks has been updated to 3.5. I never got the chance I wanted to beta test 3.5, but now I don't have to worry about it. Looking forward to the Network Bandwidth Analyzer and the Nagios integration.
I plan on doing a backup of my database tonight so I can do the update after hours. Wish me luck.
Friday, January 09, 2009
Configuring PuTTY to use PKI (passwordless) authentication
Since this is about using PuTTY I would recommend you download it if you haven't already. Also you will need to get PuTTYgen, it might be worth it to grab pscp as well. I like to keep putty.exe and puttygen.exe in my Windows directory, so I don't have to update my path, thus allowing me to run putty right from the command prompt.
Now run PuTTYGen and create a new pair of keys by clicking the “Generate” button. You will have to move your mouse around in the box to generate randomness, so keep doing that until the progress bar fills up. You can keep all the options at their default settings. Then, save both public and private key to a safe location. Name your public key [your_key_name].pub and the private key [your_key_name].ppk.
Now, upload your public key to a directory on your remote system. I used pscp to do this quickly to all of my servers (pscp [your_key_name.pub] user@remotesystem:)
Now you have to import your public key into the authorized_keys file (and authorized_keys2)
ssh-keygen -i -f [your_key_name.pub] >> .ssh/authorized_keys && ssh-keygen -i -f [your_key_name.pub] >> .ssh/authorized_keys2
Replace [your_key_name.pub] with the path to your key. Now log out and start PuTTY.
In Putty, you have to configure the following items:
In Connection/Data, add your remote user name
In Connection/SSH/Auth, browse to your private key file (.ppk)
In Sessions, fill in the FQDN or IP address of your remote machine, give your session a name [session_name] and click on Save.
Now you can use putty to SSH into your remote boxes with out a password. If you are a fan of having one or two click shortcuts create a shortcut to %windir%\putty.exe -load [session_name]. If you gave your [session_name] a name with spaces use double quotes to encase it like putty.exe -load "session name".
Thursday, November 20, 2008
Windows Firewall Allow Remote Administration using the netsh command
This is a quick oneliner that I have used in the past. I forget it now and then and always have a hell of a time looking it up again. I use it to allow my Spiceworks monitoring software access to the PC's so it can do it's thing.
netsh firewall set service remoteadmin enable
You could also add this to a WPKG package with the following code.
You could also add this to a WPKG package with the following code.
     <package id="XPFirewallRemoteAdmin" name="Allow Remote Admin" revision="1" reboot="false" notify="false" priority="2" execute="once">
          <install cmd='netsh firewall set service remoteadmin enable' />
     </package>
Thursday, October 23, 2008
Powershell: Equal Sign vs. -eq
I was just working on a script in powershell and saw the error "Length" is a ReadOnly property. It was from the code if ($args.count = 0) {exit;}. Having "grown up" writing VB code this would have worked. But in powershell you need to do if ($args.count -eq 0) {exit;} instead.
Powershell: Accept Unknown number of Args and process them
Recently I needed a script to move some files for a user. It might be two or three files but I wanted to exersise my noggin in powershell. This code will take any number of arguments and copy the files from the input directory to the output directory. Below is the code.
::Start Code::
# Display Help
if (($Args[0] -eq "-?") -or ($Args[0] -eq "-help")) {
""
"Usage: pullQualityAssesments.ps1 "
" copies the Faxjob over to the Quality Assesments folder."
""
"Example: pullQualityAssesments.ps1 400001 400002"
""
exit
}
$inputdir = "\\someserver\savedfaxjobs\"
$outputdir = "\\someotherserver\Quality Assessments\"
$x = $args.count
$i = 0
do {
$ordernumber = $args[$i]
#write-host $inputdir$ordernumber.faxjob.* $outputdir
$filelist = get-childitem $inputdir$ordernumber.faxjob.*
foreach ($file in $filelist){write-host $file}
$i++}
while ($i -le $x)
::End Code::
Unfortunatly we have 23,000+ files in our Input directory and this script is slower than me pulling them manually. Maybe someday I can revisit this to filter it down to something that works and pulls in only the files it needs.
Monday, March 10, 2008
Tarpitting IISFTP Service
If you have been running an FTP server on the internet for any amount of time at some point you have noticed hundreds or even thousands of errors in your System Event log with an Event ID of 100. In an attempt to stop these run the following command from the command prompt, but if you change the location of the script file put in the correct path for this to work.
eventtriggers /create /TR "Reset FTP Service" /TK C:\scripts\ResetFTP.bat /L System /EID 100 /SO MSFTPSVC /RU "system"
The batch file is very simple, I created mine in a folder I have on my drive called "Scripts" and named it ResetFTP.bat. The contents of the script are below.
net stop msftpsvc
ping -n 10 127.0.0.1
net start msftpsvc
Thats it! The script will run when someone enters the wrong username and password for a FTP session. It will effectively stop the server for 10 seconds (10 pings to localhost) and then restart the FTP service. On a side note it only works on Microsoft Windows 2003 Server (Windows XP) and later. Also does not work on Microsoft Windows 2000 Server as there is no "Eventtriggers" program native to Windows 2000.
eventtriggers /create /TR "Reset FTP Service" /TK C:\scripts\ResetFTP.bat /L System /EID 100 /SO MSFTPSVC /RU "system"
The batch file is very simple, I created mine in a folder I have on my drive called "Scripts" and named it ResetFTP.bat. The contents of the script are below.
net stop msftpsvc
ping -n 10 127.0.0.1
net start msftpsvc
Thats it! The script will run when someone enters the wrong username and password for a FTP session. It will effectively stop the server for 10 seconds (10 pings to localhost) and then restart the FTP service. On a side note it only works on Microsoft Windows 2003 Server (Windows XP) and later. Also does not work on Microsoft Windows 2000 Server as there is no "Eventtriggers" program native to Windows 2000.
Thursday, January 03, 2008
Fixing a bad Master Boot Record (MBR) in Microsoft Vista
A few months ago I installed CentOS on my laptops second hard drive. During this process it installed GRUB as my boot loader. Since the inital installation I have not booted back in to CentOS at all, so I removed the linux partitions from the second drive and hoped for the best. I was so wrong.
Removing those partitions removed GRUB as well, so my laptop (now my main computer) would no longer boot into Microsoft Vista Home Premium. To fix this I used the Vista DVD to boot into Windows Recovery Environment (Windows RE) and used a tool new to me Bootrec.exe.
Microsoft has a very handy article on how to use Bootrec.exe to fix just such an occasion. For my situation I had to use the /fixMBR switch and reboot. It was literally that simple!
Removing those partitions removed GRUB as well, so my laptop (now my main computer) would no longer boot into Microsoft Vista Home Premium. To fix this I used the Vista DVD to boot into Windows Recovery Environment (Windows RE) and used a tool new to me Bootrec.exe.
Microsoft has a very handy article on how to use Bootrec.exe to fix just such an occasion. For my situation I had to use the /fixMBR switch and reboot. It was literally that simple!
Tuesday, December 18, 2007
App-Domain could not be created. Error: 0x80131902
Failed to execute request because the App-Domain could not be created. Error: 0x80131902
Event-ID: 1088
Source: ASP.NET 2.0.50727.0
I was getting this error in Event Viewer while trying to run a web app. This was fresh install of IIS, but on an older server. The problem is that after IIS is installed you need to re-install the .Net framework.
Step one is to un-install the .Net framework.
Event-ID: 1088
Source: ASP.NET 2.0.50727.0
I was getting this error in Event Viewer while trying to run a web app. This was fresh install of IIS, but on an older server. The problem is that after IIS is installed you need to re-install the .Net framework.
Step one is to un-install the .Net framework.
- Open a Command Prompt
- run "net stop w3svc"
- cd %windir%\Microsoft.Net\Framework\v2.0.50727\
- run "aspnet_regiis.exe -ua"
- run "aspnet_regiis.exe -i "
- run "net start w3svc"
aspnet_regiis.exe -r may have worked instead of the two step uninstall / reinstall based on it's discription but I didn't try that option.
Wednesday, August 22, 2007
Microsoft Exchange 2007: Autodiscovery
An interesting thing I learned with Exchange 2007 and Outlook 2007, If you are running the latter than Exchange 2007 must have Autodiscovery installed and configured properly. Microsoft Technet has a decent article on how to set up and properly configure Autodiscovery.
It is importent to note that autodiscover.yourdomain.com has it's own seperate SSL certificate for things to work properly. This is an additional certificate to the one Outlook Web Access and Outlook Anywhere require to work properly.
It is importent to note that autodiscover.yourdomain.com has it's own seperate SSL certificate for things to work properly. This is an additional certificate to the one Outlook Web Access and Outlook Anywhere require to work properly.
Tuesday, June 12, 2007
Follow up to Safari for Windows!
To be blunt, I am already un-installing this piece of software (POS). The two biggest keyboard shortcuts I use don't work. It may be faster at rendering, but our website looks bad in it. If I had to use a Mac or run Linux, I would be using Firefox for sure. On Windows however I am still sticking by Internet Explorer 7.
The install process went smooth, just the standard Next, Next, Next, Finish sort of thing. Let me know what you think if you have had the unfortunate time with Safari as I have.
The install process went smooth, just the standard Next, Next, Next, Finish sort of thing. Let me know what you think if you have had the unfortunate time with Safari as I have.
Safari for Windows!
Apple has released their Safari web browser for Windows. I haven't had a chance to install it yet but I will report back on how the install went and my first impressions.
Subscribe to:
Posts (Atom)