Today I'm going to talk about how I learn a new programming language. Let me start by saying that I've never fully mastered a programming language, or even come close. My roles are that of sysadmin and not of an actual programmer. What generally happens is I'm given some task to accomplish, such as modify an already written report in our home brewed application. I will dive into the report and figure out where I need to start modifying things. Or I need to come up with a new process, but since the rest of the home brewed application is written in PHP, I'll write the new process in PHP as well, just to keep everything consistent.
I learn programming by looking at running code and modifying it to do something else or do the same thing but better or more accurately. I have trouble reading through a book and doing the simple examples and building upon that knowledge. It comes from already knowing a bit about programming and feeling dumb for re-reading what a variable is and how to assign it (pretty much the same in all programming languages).
At my last position I was able to learn a lot of PHP and I became very comfortable with it. I had worked with PHP a bit prior to this, but honestly, I had forgotten most of what I had learned. In this case, that is probably for the best, it was all spaghetti code and crap for the most part. The one thing that helped me the most was a good editor (Netbeans for PHP) and of course documentation.
My new position is with a firm that runs perl for nearly 100% of their code base. I've always had a hard time reading perl code in the past (Mostly nagios plugins). Perl uses a lot of syntax that doesn't explain what its doing just by reading it in english. So my typical take something that works and modify it has been a slower process. I'm able to get the end result that I'm looking for, but I wouldn't say "I UNDERSTAND HOW" this code works or what it honestly does.
This had led me to reading the first few chapters of a book (http://www.perl.org/books/beginning-perl/) so that I may understand the HOW something works and WHY it works, not just that it does. This might be the first programming book I actually read all the way through! So far some of the wizardry of perl is going away because I know or at least know where to look up what "=~" does and not have to guess. Some other resources I've used is of course Stackoverflow.com. Some of the users there leave answers that don't just give an answer, but explain how and why it works and examples of other ways to do the same thing.
How do you guys learn a programming language? What tools do you find are the best for learning a new programming language?
Showing posts with label software. Show all posts
Showing posts with label software. Show all posts
Thursday, May 10, 2012


Monday, April 23, 2012
FreeBSD sed -i Error "sed: 1: "FILE": bad flag in substitute command: '.' "
On FreeBSD if you use the "-i" flag with sed you must specify a backup file. The simple fix, if you don't want a backup file is to use "" (two quotes, no space between them). You could also use any other filename you wished.
Examples:
BAD: sed -i s/192.168.1.1/192.168.1.44/g file.txt
GOOD: sed -i "" s/192.168.1.1/192.168.1.44/g file.txt
Examples:
BAD: sed -i s/192.168.1.1/192.168.1.44/g file.txt
GOOD: sed -i "" s/192.168.1.1/192.168.1.44/g file.txt
Wednesday, October 26, 2011
Using DBAN for Data Sanitation
If you're getting rid of your PC at home or retiring PCs in the office it is recommended that you first wipe the drive of any remaining bit of information. I'm not going to debate the merits of method or the other, or if this is even worth while. I'm a firm believer that 99% of the time this tool will wipe your drive and the data will be unrecoverable to most people or attacks. Personally, I run the PRNG method with 8 passes to overwrite the drives I'm getting rid of. This is on top of using secure delete methods to overwrite individual files as I delete them on my PC in day to day operations.
If you're very paranoid anyhow, you should be using something like Truecrypt to encrypt everything at rest on your hard drive, and possibly even a hidden encrypted volume inside of that. Even here, I would wipe a drive when I was done with it.
The first thing to do is to download the ISO image from dban.org/download. Then you will need to burn the ISO image to a CD. (A quick Google search should get you some results.)
Once you boot your PC with the burned image you should come to this screen.
If you hit the F2 key you will see this screen.
Hitting F3 will get you this screen.
F4 will get you to this note about RAID devices. Remember always dismantle your RAID volumes before wiping them!
If you hit enter on the Initial Boot screen you'll end up here in Interactive Mode.
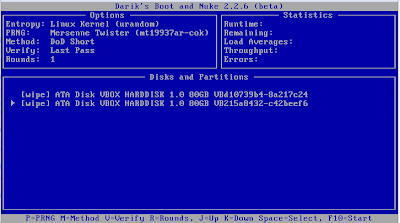
In Interactive Mode you can choose which Pseudo Random Number Generator to use. You have two choices (Mersenne Twister and ISAAC, but I go with Mersenne Twister, but apparently ISAAC is more secure.
If you need to quickly zero out a drive, such as before re-installing Microsoft Windows or for some other reason this option is for you.
Something to note, if you have multiple drives installed and selected for wipe (from Interactive Mode) they will wipe in parallel. This can speed things up significantly if you have a lot of drives to wipe
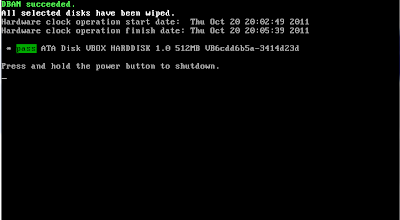
When DBAN has finished you'll come to this screen. If you don't have a Green pass next to each disk you wiped it may be a failed disk.
After running DBAN a few times you should become comfortable with the different options and what they do. I started out running in interactive mode all of the time, but now when I get to the Initial Boot Screen I simply type prng (Which used the prng method with 8 passes and verification on the last pass) and let it go to town. I only do this however on machines where I want to wipe everything. For safeties sake I always physically disconnect drives I do not want to wipe.
 |
| Initial Boot Screen |

 |
| DBAN About Page |

 |
| Quick Commands |

 |
| A message about RAID devices |

 |
| Interactive Mode |

 |
| Pseudo Random Number Generator (Mersenne Twister) explanation |

 |
| Pseudo Random Number Generator (ISAAC) explanation |

 |
| Wipe Method (Quick Erase explanation) |

 |
| Wipe Method (RCMP TSSIT OPS-II explanation) |

 |
| Wipe Method (DoD Short explanation) |

 |
| Wipe Method (DoD 5220.22-M explanation) |

 |
| Wipe Method (Gutmann Wipe explanation) |

 |
| Wipe Method (PRNG Stream explanation) |

 |
| Verification Mode (Verification Off Explanation) |

 |
| Verification Mode (Verification Last Pass Explanation) |

 |
| Verification Mode (Verification All Passes Explanation) |

 |
| Changing the number of rounds |

 |
| Running in parallel |

 |
| All Done! |

After running DBAN a few times you should become comfortable with the different options and what they do. I started out running in interactive mode all of the time, but now when I get to the Initial Boot Screen I simply type prng (Which used the prng method with 8 passes and verification on the last pass) and let it go to town. I only do this however on machines where I want to wipe everything. For safeties sake I always physically disconnect drives I do not want to wipe.
Tuesday, September 27, 2011
System Activity Report (sar) and You
sar is an acronym for System Activity Report. It takes a snapshot of the system periodically. On most distributions it comes with the sysstat package. On Redhat and derived distributions the package will install a set of cron jobs in /etc/cron.d/sysstat. There are two cron jobs to take note of. The first one runs every ten minutes as root. It runs the script /usr/lib/sa/sa1 -S Disk 1 1. This script saves its output in report files. The files are written to /var/log/sa/sar[dd], where [dd] is the two digit date for today's date. (e.g. Today is 8/26/2011. The log file is /var/log/sa/sar26)
The second cron job runs at 23:53. This cron job summarizes the days activity. Both of the reports are saved as binary data, so normal tools are useless here.
There are many flags to use with sar when running it interactivly. Some of the flags have additional atguments that are required when used. One example of thses flags is -n which al requires an additional argement suach as DEV or NFS ro IP. This specific example has eightteen (18) potential arguments, not including ALL.
With sar liberal use of the man pages are highly suggested. Not only are the flags and any arguments documented, but the headers for each one and what they represent are explained as well. This comes in handy if you get overzealous with flags and aren't quite sure what you're looking at.
I'm only going to cover some of the most notable flags, what they show and their headers. Be careful however as some flags exist in both upper and lower case and report vastly different metrics. One example of the is -b which reports on I/O transfer but -B reports on paging stats.
First off the plate is -b which as I've already stated reports on I/O transfer stats and has the following headers:
tps: Transfers per second to a physical device.
rtps: Read transfers per second to a physical device.
wtps: Write transfers per second to a physical device.
bread/s: Blocks (since kernel 2.4 = sectors = 512 bytes) read from devices per second.
bwrtn/s: Blocks written to devices per second.
Example output from a production server running: sar -b 1 1
Linux 2.6.18-274 el5PAE (server.domain.com) 8/26/2011
09:23:57 PM tps rtps wtps bread/s bwrtn/s
09:23:58 PM 7829.00 133.00 7696.00 1528.00 76960.00
Average: 7829.00 133.00 7696.00 1528.00 76960.00
-B will report paging stats. Some metrics / headers are only available in kernels 2.5 and newer.
pgpgin/s: Kilobytes paged in from disk per second.
pgpgout/s: Kilobytes paged out from disk per second.
magflt/s: Major faults per second (hits to disk, this is a bad thing...)
-c Process creation stats.
proc/s: Processes created per second.
-d Activity for each block device.
tps: Transfers per second
rd_sec/s: Sectors (512 bytes) read from block device per second.
wr_sec/s: Sectors (512 bytes) written to block device per second.
avgrq-sz: Average # of sectors
avgqu-sz: Average queue length
await: Average time in milliseconds for queue + servicing request.
svctm: Average servicing time.
%util: CPU percentage while I/O requests where issued. Close to 100% = device saturation.
-n DEV Network interface stats.
IFACE: Interface Name
rxpck/s: Packets received per second.
tcpck/s: Packets sent per second.
rxbyt/s: Bytes received per second.
txbyt/s: Bytes sent per second.
rxcmp/s: Compressed packets received per second.
txcmp/s: Compressed packets sent per second.
rxmcst/s: Multicast packets received per second.
-P ALL Per processor (or core) stats
-p Print pretty device names
Shows block devices as sda instead of dev8-0. Has no effect on Network device names.
-A same as: -bBcdqrRuvwWy -I SUM -I XALL -n ALL -P ALL
After you install the sysstat package you really need to let it run for a while and gather stats to see the real beauty of it all. However you can run it interactively if required. When running sar interactively the syntax is sar -FLAGS Interval Duration. (e.g. sar -b 2 60) runs I/O stats every two seconds for a minute. This is very hand to run if you're troubleshooting a slow system or watching it under load.
The second cron job runs at 23:53. This cron job summarizes the days activity. Both of the reports are saved as binary data, so normal tools are useless here.
There are many flags to use with sar when running it interactivly. Some of the flags have additional atguments that are required when used. One example of thses flags is -n which al requires an additional argement suach as DEV or NFS ro IP. This specific example has eightteen (18) potential arguments, not including ALL.
With sar liberal use of the man pages are highly suggested. Not only are the flags and any arguments documented, but the headers for each one and what they represent are explained as well. This comes in handy if you get overzealous with flags and aren't quite sure what you're looking at.
I'm only going to cover some of the most notable flags, what they show and their headers. Be careful however as some flags exist in both upper and lower case and report vastly different metrics. One example of the is -b which reports on I/O transfer but -B reports on paging stats.
First off the plate is -b which as I've already stated reports on I/O transfer stats and has the following headers:
tps: Transfers per second to a physical device.
rtps: Read transfers per second to a physical device.
wtps: Write transfers per second to a physical device.
bread/s: Blocks (since kernel 2.4 = sectors = 512 bytes) read from devices per second.
bwrtn/s: Blocks written to devices per second.
Example output from a production server running: sar -b 1 1
Linux 2.6.18-274 el5PAE (server.domain.com) 8/26/2011
09:23:57 PM tps rtps wtps bread/s bwrtn/s
09:23:58 PM 7829.00 133.00 7696.00 1528.00 76960.00
Average: 7829.00 133.00 7696.00 1528.00 76960.00
-B will report paging stats. Some metrics / headers are only available in kernels 2.5 and newer.
pgpgin/s: Kilobytes paged in from disk per second.
pgpgout/s: Kilobytes paged out from disk per second.
magflt/s: Major faults per second (hits to disk, this is a bad thing...)
-c Process creation stats.
proc/s: Processes created per second.
-d Activity for each block device.
tps: Transfers per second
rd_sec/s: Sectors (512 bytes) read from block device per second.
wr_sec/s: Sectors (512 bytes) written to block device per second.
avgrq-sz: Average # of sectors
avgqu-sz: Average queue length
await: Average time in milliseconds for queue + servicing request.
svctm: Average servicing time.
%util: CPU percentage while I/O requests where issued. Close to 100% = device saturation.
-n DEV Network interface stats.
IFACE: Interface Name
rxpck/s: Packets received per second.
tcpck/s: Packets sent per second.
rxbyt/s: Bytes received per second.
txbyt/s: Bytes sent per second.
rxcmp/s: Compressed packets received per second.
txcmp/s: Compressed packets sent per second.
rxmcst/s: Multicast packets received per second.
-P ALL Per processor (or core) stats
-p Print pretty device names
Shows block devices as sda instead of dev8-0. Has no effect on Network device names.
-A same as: -bBcdqrRuvwWy -I SUM -I XALL -n ALL -P ALL
After you install the sysstat package you really need to let it run for a while and gather stats to see the real beauty of it all. However you can run it interactively if required. When running sar interactively the syntax is sar -FLAGS Interval Duration. (e.g. sar -b 2 60) runs I/O stats every two seconds for a minute. This is very hand to run if you're troubleshooting a slow system or watching it under load.
Monday, September 26, 2011
Changing the from e-mail address in Nagios
This is going to be another short one. I recently had a need to change the FROM address for e-mail from our Nagios installation. E-mail was coming from nagios@host.domain.com, which is non-route-able from outside our network.
The change is very simple. Change the two command lines in your Nagios commands.cfg dealing with notify by e-mail. The command names are "notify-host-by-email" and "notify-service-by-email".
By default these lines read:
/usr/bin/printf "%b" "***** Nagios *****\n\nNotification Type: $NOTIFICATIONTYPE$\nHost: $HOSTNAME$\nState: $HOSTSTATE$\nAddress: $HOSTADDRESS$\nInfo: $HOSTOUTPUT$\n\nDate/ Time: $LONGDATETIME$\n" | /bin/mail -s "** $NOTIFICATIONTYPE$ Host Alert: $HOSTNAME$ is $HOSTSTATE$ **" $CONTACTEMAIL$
and
/usr/bin/printf "%b" "***** Nagios *****\n\nNotification Type: $NOTIFICATIONTYPE$\n\nService: $SERVICEDESC$\nHost: $HOSTALIAS$\nAddress: $HOSTADDRESS$\nState: $SERVICESTATE $\n\nDate/Time: $LONGDATETIME$\n\nAdditional Info:\n\n$SERVICEOUTPUT$" | /bin/mail -s "** $NOTIFICATIONTYPE$ Service Alert: $HOSTALIAS$/$SERVICEDESC$ is $SERVICESTATE$ **" $CONTACTEMAIL$
To change the from address you append " -- -f nagios@domain.com", that is without the quotes of course. So the new lines look like:
/usr/bin/printf "%b" "***** Nagios *****\n\nNotification Type: $NOTIFICATIONTYPE$\nHost: $HOSTNAME$\nState: $HOSTSTATE$\nAddress: $HOSTADDRESS$\nInfo: $HOSTOUTPUT$\n\nDate/ Time: $LONGDATETIME$\n" | /bin/mail -s "** $NOTIFICATIONTYPE$ Host Alert: $HOSTNAME$ is $HOSTSTATE$ **" $CONTACTEMAIL$ -- -f nagios@domain.com
and
/usr/bin/printf "%b" "***** Nagios *****\n\nNotification Type: $NOTIFICATIONTYPE$\n\nService: $SERVICEDESC$\nHost: $HOSTALIAS$\nAddress: $HOSTADDRESS$\nState: $SERVICESTATE $\n\nDate/Time: $LONGDATETIME$\n\nAdditional Info:\n\n$SERVICEOUTPUT$" | /bin/mail -s "** $NOTIFICATIONTYPE$ Service Alert: $HOSTALIAS$/$SERVICEDESC$ is $SERVICESTATE$ **" $CONTACTEMAIL$ -- -f nagios@domain.com
To explain it a little what we appended was a space followed by two dashes, which forces mail to pass those along to sendmail. Send mails sees the addition of a dash followed by the letter f and then another space and the e-mail address you want to send from.
On my system this is an alias for myself so that all replies come to my inbox.
All of this works on CentOS which is what I'm currently running. It should work on other distributions as well, but I haven't the time to verify that.
The change is very simple. Change the two command lines in your Nagios commands.cfg dealing with notify by e-mail. The command names are "notify-host-by-email" and "notify-service-by-email".
By default these lines read:
/usr/bin/printf "%b" "***** Nagios *****\n\nNotification Type: $NOTIFICATIONTYPE$\nHost: $HOSTNAME$\nState: $HOSTSTATE$\nAddress: $HOSTADDRESS$\nInfo: $HOSTOUTPUT$\n\nDate/ Time: $LONGDATETIME$\n" | /bin/mail -s "** $NOTIFICATIONTYPE$ Host Alert: $HOSTNAME$ is $HOSTSTATE$ **" $CONTACTEMAIL$
and
/usr/bin/printf "%b" "***** Nagios *****\n\nNotification Type: $NOTIFICATIONTYPE$\n\nService: $SERVICEDESC$\nHost: $HOSTALIAS$\nAddress: $HOSTADDRESS$\nState: $SERVICESTATE $\n\nDate/Time: $LONGDATETIME$\n\nAdditional Info:\n\n$SERVICEOUTPUT$" | /bin/mail -s "** $NOTIFICATIONTYPE$ Service Alert: $HOSTALIAS$/$SERVICEDESC$ is $SERVICESTATE$ **" $CONTACTEMAIL$
To change the from address you append " -- -f nagios@domain.com", that is without the quotes of course. So the new lines look like:
/usr/bin/printf "%b" "***** Nagios *****\n\nNotification Type: $NOTIFICATIONTYPE$\nHost: $HOSTNAME$\nState: $HOSTSTATE$\nAddress: $HOSTADDRESS$\nInfo: $HOSTOUTPUT$\n\nDate/ Time: $LONGDATETIME$\n" | /bin/mail -s "** $NOTIFICATIONTYPE$ Host Alert: $HOSTNAME$ is $HOSTSTATE$ **" $CONTACTEMAIL$ -- -f nagios@domain.com
and
/usr/bin/printf "%b" "***** Nagios *****\n\nNotification Type: $NOTIFICATIONTYPE$\n\nService: $SERVICEDESC$\nHost: $HOSTALIAS$\nAddress: $HOSTADDRESS$\nState: $SERVICESTATE $\n\nDate/Time: $LONGDATETIME$\n\nAdditional Info:\n\n$SERVICEOUTPUT$" | /bin/mail -s "** $NOTIFICATIONTYPE$ Service Alert: $HOSTALIAS$/$SERVICEDESC$ is $SERVICESTATE$ **" $CONTACTEMAIL$ -- -f nagios@domain.com
To explain it a little what we appended was a space followed by two dashes, which forces mail to pass those along to sendmail. Send mails sees the addition of a dash followed by the letter f and then another space and the e-mail address you want to send from.
On my system this is an alias for myself so that all replies come to my inbox.
All of this works on CentOS which is what I'm currently running. It should work on other distributions as well, but I haven't the time to verify that.
Tuesday, September 20, 2011
Powershell Get-ChildItem Count 1 result
This is going to be a quick one. I'm working on a new Powershell script (my second) and I'm doing some sanity checks before I actually try to continue the workflow.
If you run the command below and it returns only one item and then either try to print out $fileCount or run an if statement or something against it like if ($fileCount -gt 0){do some stuff} the "do some stuff" won't happen.
#$fileCount = $(get-childitem C:\ -filter *.zip).count
This is because the count method returns an array, which if only one item is in it doesn't get created and thus is 0. To get around this you must create the array first. You can do this in the same line of code as shown below.
#$fileCount = @(get-childitem C:\ -filter *.zip).count
The at sign there will create the array and you will have one item in it.
If you run the command below and it returns only one item and then either try to print out $fileCount or run an if statement or something against it like if ($fileCount -gt 0){do some stuff} the "do some stuff" won't happen.
#$fileCount = $(get-childitem C:\ -filter *.zip).count
This is because the count method returns an array, which if only one item is in it doesn't get created and thus is 0. To get around this you must create the array first. You can do this in the same line of code as shown below.
#$fileCount = @(get-childitem C:\ -filter *.zip).count
The at sign there will create the array and you will have one item in it.
Wednesday, February 09, 2011
Strange Nagios Error Solved
This morning I added some new services to a server, but they wouldn't move out of "Pending" status. The error I received was
"Feb 9 09:27:36 nagios: Warning: Check result queue contained results for service '' on host '', but the service could not be found! Perhaps you forgot to define the service in your config files?"
I stopped the nagios service and ran ps -ef | grep nagios. To my surprise there was still a Nagios instance running. This means two things. First the init script that comes with Nagios is borked and doesn't correctly check for running nagios instances. Second, I somehow started a second Nagios instance.
I thought something was up in the first place because every other refresh or so of the Nagios web view I would either see the three pending services or I wouldn't. This was my first clue that something was borked. I then went to tail /var/log/messages and saw the error message. Then I started investigating the issue with the help of Google. Once I saw that there where two instances of Nagios things started to make sense.
I killed the second Nagios instance and any children processes (in my case ndo2db) and then restarted nagios via the init script.
Once I had everything up and running (but only one instance) I was able to successfully check my new services.
"Feb 9 09:27:36
I stopped the nagios service and ran ps -ef | grep nagios. To my surprise there was still a Nagios instance running. This means two things. First the init script that comes with Nagios is borked and doesn't correctly check for running nagios instances. Second, I somehow started a second Nagios instance.
I thought something was up in the first place because every other refresh or so of the Nagios web view I would either see the three pending services or I wouldn't. This was my first clue that something was borked. I then went to tail /var/log/messages and saw the error message. Then I started investigating the issue with the help of Google. Once I saw that there where two instances of Nagios things started to make sense.
I killed the second Nagios instance and any children processes (in my case ndo2db) and then restarted nagios via the init script.
Once I had everything up and running (but only one instance) I was able to successfully check my new services.
Thursday, October 14, 2010
Using PSExec to Defragment your PCs
Way back in 2000 / 2001 I was an IT intern. My job was to do the really manual processes for a small department with in a much larger company. One of those was monthly defrags of all PCs and Laptops (if they where available). I had to go to each and every PC, log on, and start the defrag process manually. I believe this to be my first moment of "I should automate this". Problem was I didn't know how or really where to start. I knew script was the answer, but just couldn't get things to work. I believe I eventually created a scheduled task on each machine (by hand) to do this for us.
Fast forward 10 years and I am still in need of the same thing, as we don't have Vista or Windows 7 deployed. But now I have a much better understanding of what needs to happen and even better I know where to start!
PSExec, which is part of the System Internals PsTools suite is my answer these days. A simple script, run from my PC (still manually for the time being) is able to handle defragmenting all of our PCs.
psexec @C:\Updates\Comps\AppPCs.txt -n 10 -c -f -d JkDefragCMD.exe
I use the files with PC names to speed up re-deployment of everything. The -n 10 flag tells psexec t0 wait 10 seconds before it times out the PC, instead of 60 (I believe this is the default). -c copies the file (jkdefragcmd.exe) to the remote system. The flag -f forces copying, even if the file exists. The flag -d doesn't wait for the process to terminate, this is as asynchronously as I can do.
My next step is to hook this up to task scheduler and have it run the first Sunday or something.
Fast forward 10 years and I am still in need of the same thing, as we don't have Vista or Windows 7 deployed. But now I have a much better understanding of what needs to happen and even better I know where to start!
PSExec, which is part of the System Internals PsTools suite is my answer these days. A simple script, run from my PC (still manually for the time being) is able to handle defragmenting all of our PCs.
psexec @C:\Updates\Comps\AppPCs.txt -n 10 -c -f -d JkDefragCMD.exe
I use the files with PC names to speed up re-deployment of everything. The -n 10 flag tells psexec t0 wait 10 seconds before it times out the PC, instead of 60 (I believe this is the default). -c copies the file (jkdefragcmd.exe) to the remote system. The flag -f forces copying, even if the file exists. The flag -d doesn't wait for the process to terminate, this is as asynchronously as I can do.
My next step is to hook this up to task scheduler and have it run the first Sunday or something.
Monday, September 13, 2010
How to Reset the Password(s) on a Linksys SRW248G4 Switch
- Connect to the Serial port on the back of the switch with a serial cable. (Putty on Windows works well)
- The defaults for connecting to the serial port are 38400 baud, 8 data bits, no parity, 1 stop bit, no flow control.
- Confirm that you have an active serial connection by pressing enter a couple of times. You should receive a login screen
- Once you have successfully connected to the serial port restart the switch by unplugging the power. (Either from back or from the power strip, my preferred method is the back)
- The switch will start its POST process.
- Look for the line “Autoboot in 2 seconds - press RETURN or Esc. to abort and enter prom.” (Please note: Do not hold down Esc. or Enter. Only press it once.)
- You will know that you interrupted the boot sequence when you are prompted with a startup menu. Select option 3 “Password Recovery Procedure”.
- The screen will display “The current password will be ignored!”. Press Enter to reboot the switch.
- Once the switch has restarted login with the default admin user and no password. This will work on either the terminal or the web interface. Proceed to create / modify users and passwords. This does not reset the rest of the configuration, just user accounts.
- Once you have your new credentials reboot the switch again. Document the credentials.
- Verify that your new credentials work by logging into either the web interface for the command line interface.
- Disconnect the cable and store it safely.
Thursday, August 19, 2010
How to Enable Windows 7 GodMode
God mode in Windows 7 is similar to TweakUI in Windows XP, but is really simple to setup and requires no installation.
1. Create a new folder.
2. GodMode windowRename the folder to
GodMode.{ED7BA470-8E54-465E-825C-99712043E01C}
(note that you can change the “GodMode” text, but the following period and code number are required).
I create this folder in my home directory.
1. Create a new folder.
2. GodMode windowRename the folder to
GodMode.{ED7BA470-8E54-465E-825C-99712043E01C}
(note that you can change the “GodMode” text, but the following period and code number are required).
I create this folder in my home directory.
Monday, July 26, 2010
Installing Backup Exec System Restore on CentOS 5.5 and First backup / restore
As I said in my review I would telling you how to install this on CentOS 5.5, so here it is.
Normally one would simply run the Symantec_Backup_Exec_System_Recovery.bin with ./Symantec_Backup_Exec_System_Recovery.bin. But on a non-supported distribution / kernel that won't work.
However all is not lost! You can install this with a little shell-fu.
Instead of ./Symantec_Backup_Exec_System_Recovery.bin run
./Symantec_Backup_Exec_System_Recovery.bin --noexec --target .
This will extract the contents of the binary to the current directory. Next you need to install a few RPM packages, but you need to know what version of kernel you are running (for me it was either PAE or non-PAE). So I ran uname -a to see what version of the kernel that machine was running.
rpm -Uhv SymSnap/symbdsnap-1.0.1-36146.2.6.18_8.el5PAE.i686.rpm
rpm -Uhv symmount-1.0.1-36352.i686.rpm
rpm -Uhv besr-1.0.1-36352.i686.rpm
Once all of these packages are installed I was able to do my first backup. And by first backup I mean first three (/boot, /, and SWAP). While I probably don't need to do all three (/boot and /) I don't want to have to create a SWAP system after a restore. So I ran all three.
besr -b/dev/sda1 -d /Storage/backups/hostname/boot.v2i -use-aes-encryption standard -p SoM3SupErSecureP@ssW0rd -compress Standard
besr -b /dev/mapper/VolGroup00-LogVol00 -d /Storage/backups/hostname/Vol00Log00.v2i -use-aes-encryption standard -p SoM3SupErSecureP@ssW0rd -compress Standard
besr -b /dev/mapper/VolGroup00-LogVol01 -d /Storage/backups/hostname/Vol00Log01.v2i -use-aes-encryption standard -p SoM3SupErSecureP@ssW0rd -compress Standard
Now in /Storage/backups/hostname I have three files
boot.v2i
Vol00Log00.v2i
Vol00Log01.v2i
If I needed to restore these I would use the Backup Exec System Recovery Windows based LiveCD. During the restore I would choose all three of these in the order shown above.
After the restore process was finished I need to boot using the gparted LiveCD. Once in I would open up a terminal and install grub on to my sda hard drive.
#grub
#root (hd0,0)
#setup (hd0)
#quit
Once grub is installed on sda I needed to update fstab to no longer look for / on the /dev/mapper/VolGroup00-LogVol00 and swap to not be on /dev/mapper/VolGroup00-LogVol01.
Normally one would simply run the Symantec_Backup_Exec_System_Recovery.bin with ./Symantec_Backup_Exec_System_Recovery.bin. But on a non-supported distribution / kernel that won't work.
However all is not lost! You can install this with a little shell-fu.
Instead of ./Symantec_Backup_Exec_System_Recovery.bin run
./Symantec_Backup_Exec_System_Recovery.bin --noexec --target .
This will extract the contents of the binary to the current directory. Next you need to install a few RPM packages, but you need to know what version of kernel you are running (for me it was either PAE or non-PAE). So I ran uname -a to see what version of the kernel that machine was running.
rpm -Uhv SymSnap/symbdsnap-1.0.1-36146.2.6.18_8.el5PAE.i686.rpm
rpm -Uhv symmount-1.0.1-36352.i686.rpm
rpm -Uhv besr-1.0.1-36352.i686.rpm
Once all of these packages are installed I was able to do my first backup. And by first backup I mean first three (/boot, /, and SWAP). While I probably don't need to do all three (/boot and /) I don't want to have to create a SWAP system after a restore. So I ran all three.
besr -b/dev/sda1 -d /Storage/backups/hostname/boot.v2i -use-aes-encryption standard -p SoM3SupErSecureP@ssW0rd -compress Standard
besr -b /dev/mapper/VolGroup00-LogVol00 -d /Storage/backups/hostname/Vol00Log00.v2i -use-aes-encryption standard -p SoM3SupErSecureP@ssW0rd -compress Standard
besr -b /dev/mapper/VolGroup00-LogVol01 -d /Storage/backups/hostname/Vol00Log01.v2i -use-aes-encryption standard -p SoM3SupErSecureP@ssW0rd -compress Standard
Now in /Storage/backups/hostname I have three files
boot.v2i
Vol00Log00.v2i
Vol00Log01.v2i
If I needed to restore these I would use the Backup Exec System Recovery Windows based LiveCD. During the restore I would choose all three of these in the order shown above.
After the restore process was finished I need to boot using the gparted LiveCD. Once in I would open up a terminal and install grub on to my sda hard drive.
#grub
#root (hd0,0)
#setup (hd0)
#quit
Once grub is installed on sda I needed to update fstab to no longer look for / on the /dev/mapper/VolGroup00-LogVol00 and swap to not be on /dev/mapper/VolGroup00-LogVol01.
Backup Exec System Recovery Review
I asked a question over on Serverfault about backup software that supported Windows and Linux and did Bare-Metal Recovery and the response I got was to try Backup Exec System Recovery, which so far has been pretty good.
The bad stuff:
1) Restore CD creation on CentOS is impossible from what I have tried and can tell. They really do mean Redhat Enterprise Linux only.
2) Bare-metal recovery with MBR restore doesn't work. Which means I have to install grub after a restore.
3) LVM support is once again not there or well hidden.
4) Centralized management. It is a separate 1GB download as an Addon. I did the download and install, but now I can't find the Management console. Setting up each of our servers isn't too big of a problem, but I really wanted one window to view for backups.
5) There is no built in scheduler with Linux.
6) There is no incremental backup in Linux.
The good stuff:
1) It works on CentOS with a little bit of hacker-y to install (more on that in another post).
2) It is easy to install and configure on Windows, even though it requires a reboot. (BOO!)
3) It is pretty quick to get a backup started.
4) The backup procedure is different on Windows than on Linux. Windows is GUI based 100%. (I haven't looked to see if I can configure a backup from the command line.) While Linux is 100% CLI.
5) The Windows based restore CD is a pretty useful tool with out limits (unlike the Acronis Boot Disk).
6)Restores are quick and pretty simple to do.
All in all after trying three different products and looking at half a dozen I think this may be the winner.
CHECK_NRPE: Error - Could not complete SSL handshake
Recently I have been auditing our servers versus what we check in nagios versus what we need to do when a system is rebooted during routine maintenance. I found that two of our servers have been left out of nagios monitoring even though they are on my maintenance checklist, and they have software that I still start by hand (I KNOW IT'S NOT A BEST PRACTICE!).
Both servers had NRPE installed and configured (mostly), one of them even had a configuration file on the nagios server but it wasn't enabled (hostname.disabled instead of hostname.cfg). The other server needed a configuration file, but even then it wasn't working, so here are my troubleshooting steps:
1) Check to see that NRPE is compiled and installed. [It was]
2) Check that NRPE was listening (netstat -an | grep 5666) [It was]
3) Check that NRPE was listed in /etc/services [It wasn't]
4) Check the NRPE config file (/etc/xinetd.d/nrpe) for "only_from = 127.0.0.1 192.168.100.31" [It wasn't]
So I added the service definition to /etc/services and the nagios server IP to the only from line and restarted xinetd (service xinetd restart) and I was finally able to connect from my nagios server.
All of this is on CentOS 5.5 for both the server and the client.
Both servers had NRPE installed and configured (mostly), one of them even had a configuration file on the nagios server but it wasn't enabled (hostname.disabled instead of hostname.cfg). The other server needed a configuration file, but even then it wasn't working, so here are my troubleshooting steps:
1) Check to see that NRPE is compiled and installed. [It was]
2) Check that NRPE was listening (netstat -an | grep 5666) [It was]
3) Check that NRPE was listed in /etc/services [It wasn't]
4) Check the NRPE config file (/etc/xinetd.d/nrpe) for "only_from = 127.0.0.1 192.168.100.31" [It wasn't]
So I added the service definition to /etc/services and the nagios server IP to the only from line and restarted xinetd (service xinetd restart) and I was finally able to connect from my nagios server.
All of this is on CentOS 5.5 for both the server and the client.
Tuesday, May 04, 2010
Acronis Backup and Recovery Advanced Server 10
Getting up and running with Acronis Backup and Recovery Advanced Server 10 is pretty quick, especially for the demo. It took under an hour to install, configure and start backing up a Windows 2008 Standard server. Getting the Backup agent installed on our Linux servers took a little bit more work because of the SnapAPI kernel modules. After a little bit of digging around in the Acronis knowledge base I was able to resolve all of the issues I had getting the Acronis Backup Agent installed on our CentOS 5.4 servers. If we go with Acronis Backup and Recovery Advanced Server 10 I will need to add some additional lines to our Linux Post-Install script to add in the kernel-devel package and the additional RPMs that the agent needs. (DKMS and SnapAPI) both of which are already on our Storage drive.
With our second trial run here we where able to resolve most of the outstanding issues we had from the first trial. Namely excessive recovery times and recovering to dis-similar hardware. I have yet to truly attempt a Linux restore to dis-similar hardware, but I have the base system recovered and the instructions, so I will be attempting one later this week (with results to follow). Restoring our Windows machines to either dis-similar hardware or a VM is pretty straight forward with the Universal Restore CD. The main problem holding us back in those scenarios is not having the drivers readily available for post install. This can be remedied by always going to VM and installing the VM tools as they also contain the drivers for the system.
Each backup policy allows us to modify settings for the backups such as Encryption, Compression, and throttling resources. The encryption can have a separate encryption key and varying levels of encryption from none to AES-128, AES-192, and finally AES-256. The automated backups can do a simple backup plan with full and incremental that are stored as a file on the storage system. The policy also allows us to run custom commands before and after the backup so can could do a virus scan, or shred temp files or what ever we desired.
One of the strangest problems I came across was while doing the restores to VM, if started from the VMs Console after picking the Disk to recover to the process could take hours to complete. Whereas if I did the same restore on to physical hardware the process would take seconds. The work around is to boot the VM from the Universal Restore CD and use the Management Console to connect to the VM. Once connected to the VM from the Management console I was able to start the restore in a matter of minutes, more akin to a physical machine.
Something to remember when setting up the backup policy for Linux machines that utilize LVM is to back up the disk as a whole. You don't want to backup the LVM by its self because after the restore it will fail to boot.
All in all I feel that Acronis would make a wonderful addition to our eco-system. It fulfills all of the requirements of our backup scheme, except the web based access, which is not uncommon for Windows based software.
With our second trial run here we where able to resolve most of the outstanding issues we had from the first trial. Namely excessive recovery times and recovering to dis-similar hardware. I have yet to truly attempt a Linux restore to dis-similar hardware, but I have the base system recovered and the instructions, so I will be attempting one later this week (with results to follow). Restoring our Windows machines to either dis-similar hardware or a VM is pretty straight forward with the Universal Restore CD. The main problem holding us back in those scenarios is not having the drivers readily available for post install. This can be remedied by always going to VM and installing the VM tools as they also contain the drivers for the system.
Each backup policy allows us to modify settings for the backups such as Encryption, Compression, and throttling resources. The encryption can have a separate encryption key and varying levels of encryption from none to AES-128, AES-192, and finally AES-256. The automated backups can do a simple backup plan with full and incremental that are stored as a file on the storage system. The policy also allows us to run custom commands before and after the backup so can could do a virus scan, or shred temp files or what ever we desired.
One of the strangest problems I came across was while doing the restores to VM, if started from the VMs Console after picking the Disk to recover to the process could take hours to complete. Whereas if I did the same restore on to physical hardware the process would take seconds. The work around is to boot the VM from the Universal Restore CD and use the Management Console to connect to the VM. Once connected to the VM from the Management console I was able to start the restore in a matter of minutes, more akin to a physical machine.
Something to remember when setting up the backup policy for Linux machines that utilize LVM is to back up the disk as a whole. You don't want to backup the LVM by its self because after the restore it will fail to boot.
All in all I feel that Acronis would make a wonderful addition to our eco-system. It fulfills all of the requirements of our backup scheme, except the web based access, which is not uncommon for Windows based software.
Monday, April 19, 2010
NDO2DB daemon startup script
I would like to thank Chris over at http://sysengineers.wordpress.com for the excellent post on how to daemonize NDO2DB. His post NDO2DB startup script for RH (EL) / OEL does an excellent job getting everything working. I had to make one small change to the script as I kept my ndo2db executable as ndo2db-3x instead of just ndo2db.
For me this fixes a problem where I have to remember to manually start the ndo2db service after a server restart, which hasn't been happening the past few times. The second way I am going to fix this problem is by creating a checklist of things that need to happen during a server restart / boot up sequence for each PC. This will also reduce the effort needed for when I move the rack later this year. The third way I will be checking this is by adding a check to Nagios to make sure this is running at all times.
This also illustrates my general way of checking / double checking things. One go off of a checklist. The double check is to verify that Nagios is seeing the same thing.
Wednesday, April 07, 2010
Helpful Tech Support!
I don't often gush about good experiences, but I recently had an issue with Spiceworks, which ended up being a configuration problem on my end. Not only did the Support Engineer help me with my issue but they also saw another configuration issue and made some recommendations on how to fix it. Additionally they told me about a bug in the software that I was not aware of that has been affecting the performance!
Also the support rep was able to do all of this and not make me feel like an idiot!
TL;DR
Had a problem. It was fixed. Also fixed two other issues I didn't know I had!
Also the support rep was able to do all of this and not make me feel like an idiot!
TL;DR
Had a problem. It was fixed. Also fixed two other issues I didn't know I had!
Wednesday, February 10, 2010
Mounting a LVM volume in Ubuntu (Live CD)
A while back my testing server crashed. This was no surprise to anyone as it was just a (Very) old workstation. However it was running my nagios install in a production setting. I had been meaning to move it to a proper server, but just hadn't gotten around to it. To make matters worse, I didn't back any of it up. So thankfully it was only the motherboard that failed and not the HDD.
I mounted the HDD in another PC I had sitting around and booted it using Ubuntu Live CD.
First, boot Ubuntu.
Second, install the needed tools:
$ sudo apt-get install lvm2
Third, load the modules to do our task:
$ sudo modprobe dm-mod
Fourth, scan the system for LVM volumes. Look for the volumes you want to mount. Typically this will be VolGroup00:
$ sudo vgscan
Fifth, we need to activate the volume(s):
$ sudo vgtchange -ay VolGroup00
Sixth, Look for the logical volume containing the root file system. Typically this will be LogVol00:
$ sudo lvs
Seventh, create the directory to mount the drive:
$ sudo mkdir /mnt/restore
Eighth, Mount the volume to the directory you just created.
$ sudo mount /dev/VolGroup00/LogVol00 /mnt/restore -o ro,user
Ninth, Copy your files off of the drive.
$ cp /mnt/restore/some/dir/and/path /some/dir/and/path
Tenth, Setup what ever backup means you have on the new server!
All in all this wasn't a terrible thing, it could have been much worse. I have since moved the nagios setup to a virtual machine and am backing it up nightly.
Upgrading the Firmware on a 3com 4500 switch
Again, this is mostly for my own notes, but someone else may find it useful. Last year we purchased a 3c0m POE switch for our new VoIP phone system. This year I needed to update the firmware on it, but with only 8MB of flash drive I ran into a few problems.
First off, BACK UP EVERYTHING!
I used the TFTP method to transfer files to and from the switch. I used Solarwinds TFTP Server on my PC.
File name Prefix / Suffix
s3n / .app = 4500 application software.
s30 / .btm = 4500 boot ROM software
s3p / .web = 4500 web file (HTTP management interface)
3comOScfg.def / .def = 4500 config file
So first things first backing up via TFTP:
<4500>tftp [IP OF TFTP SERVER] put flash:/s3004_01.btm
<4500>tftp [IP OF TFTP SERVER] put flash:/s3p04_03.web
<4500>tftp [IP OF TFTP SERVER] put flash:/s3n03_03_02s56p05.app
<4500>tftp [IP OF TFTP SERVER] put flash:/3comOScfg.def
Please change these files as you see fit. Do a dir on the root directory to get the listing for your particular switch.
Now that we have that backed up we need to clean up the flash:/ drive to make room for the updates.
<4500>delete s3004_01.btm
<4500>delete s3p04_03.web
<4500>detete s3n03_03_02s56p05.app
Now we also have to empty the recycle-bin. This is where I got stuck as I didn't know a CLI could have a recycle-bin, or have never seen it done before.
<4500>reset recycle-bin
See as we now have the free space we need to get the new files we can pull them down from the TFTP server.
<4500>tftp [IP OF TFTP SERVER] get s3p02_01.web
<4500>tftp [IP OF TFTP SERVER] get s3o01_01.btm
<4500>tftp [IP OF TFTP SERVER] get s3n03_02_00s56.app
Again, you will need to use the files that are the current firmware update.
One of the last steps is to tell the switch what files to use on next boot.
<4500>boot boot-loader flash:/s3n03_02_00s56.app
<4500>boot bootrom flash:/s3o02_01.btm
Finally we will save the configuration and reboot the switch.
<4500>save
<4500>reboot
Thats it! After the switch reboots you will be running the newest software, except for the .web file. For some reason this is left out of all of the documentation that comes with the update. I didn't write down the commands I used to get it to update, and I honestly don't think they worked.
Monday, August 03, 2009
How do I disable PS2 Parental Controls?
Again this is one of those things that I had to figure out and I wanted some place to keep it just in case I needed it again. I realize that this won't come in handy for anyone actually reading this blog, but still.
While watching a DVD hit "Select" on the controller. While on the menu find the icon called "Setup". Click it and then find "Custom Setup". Now go down to the "Parental Control" and change the settings to your liking. I choose "Off" because I never want to be bothered by the parental control features.
To save your changes eject and take out the DVD, which will kick the PS2 back to the setup screen. Then turn off the power or reset it.
Tuesday, February 17, 2009
memcached init.d statup scripts for CentOS 5.2.
While working to setup memcached on my CentOS servers I came across these scripts. They are the typical startup, restart, shutdown, status scripts I am sure you are used to using.
I found them on both http://www.dev411.com/wiki/Memcached_startup_files_for_Red_Hat_(RHEL) and http://www.vbseo.com/blogs/danny-bembibre/daemon-scripts-memcached-44/.
Both sites have the same script contents but I feel that vbseo.com has the more complete instructions.
Subscribe to:
Posts (Atom)