This is going to be a quick one. I'm working on a new Powershell script (my second) and I'm doing some sanity checks before I actually try to continue the workflow.
If you run the command below and it returns only one item and then either try to print out $fileCount or run an if statement or something against it like if ($fileCount -gt 0){do some stuff} the "do some stuff" won't happen.
#$fileCount = $(get-childitem C:\ -filter *.zip).count
This is because the count method returns an array, which if only one item is in it doesn't get created and thus is 0. To get around this you must create the array first. You can do this in the same line of code as shown below.
#$fileCount = @(get-childitem C:\ -filter *.zip).count
The at sign there will create the array and you will have one item in it.
Showing posts with label Windows 7. Show all posts
Showing posts with label Windows 7. Show all posts
Tuesday, September 20, 2011


Tuesday, September 13, 2011
File Checksum Integrity Verifier utility or SHA1 / MD5 checksum utility for Windows
On Linux if you need to verify the file you just downloaded is untouched you run either sha1sum or md5sum on the file to get the checksum and verify it against the published checksum. There are some utilities available for Windows, but today I'm going to point the spotlight at a Microsoft offering, File Checksum Integrity Verifier or fciv for short. You can grab the download from Microsoft's site.
There are a few options available when you run the command, such as -md5 to get the md5 checksum of a file or -sha1 to get the sha1 checksum of a file. But you can also use the -both flag to get both checksums of a given file. You can even create you own database of checksums to verify the files later.
To generate the checksums and store them in the database (xml file) run:
>fciv -both -xml fcdatabase.xml filetocheck.txt
The command above will obviously store both checksums and on a large file could take a while to run, as it needs to run twice on the file, once for the sha1 sum and once for the md5 sum. You of course can use one or the other check sum algorithm if you prefer (I prefer sha1 for the time being).
To later verify a file against the database you run the command shown below:
>fciv -sha1 -xml fcdatabase.xml filetocheck.txt
Now if you make changes to filetocheck.txt and run the command below you will see that verifying the file against the database it has changed. If this where an executable it may either be corrupt or compromised. If it was the project you've been working on for weeks, now is a good time to restore from backup, if the change wasn't expected of course.
>fciv -v -xml fcdatabase.xml filetocheck.txt
You'll see something like:
c:\users\mymcp\fcdatabase.xml
Hash is : 48a5967227b85c6805f3210832a155da
It should be : 04518689efadfdf2393b533dc9c7c8b5
My only real complaint is that fciv doesn't show any sort of progress while processing a large directory. It would be nice to see a file names flying by the screen or something. All in all though this is a tool worth checking out if you run Windows and don't have another tool already in your arsenal.
I would like to know if any of you have a tool in your arsenal already for this purpose and what it is / where I can find it. Sadly I don't recall any of the tools I've used in the past, but this one may become my tool of choice for this job.
There are a few options available when you run the command, such as -md5 to get the md5 checksum of a file or -sha1 to get the sha1 checksum of a file. But you can also use the -both flag to get both checksums of a given file. You can even create you own database of checksums to verify the files later.
To generate the checksums and store them in the database (xml file) run:
>fciv -both -xml fcdatabase.xml filetocheck.txt
The command above will obviously store both checksums and on a large file could take a while to run, as it needs to run twice on the file, once for the sha1 sum and once for the md5 sum. You of course can use one or the other check sum algorithm if you prefer (I prefer sha1 for the time being).
To later verify a file against the database you run the command shown below:
>fciv -sha1 -xml fcdatabase.xml filetocheck.txt
Now if you make changes to filetocheck.txt and run the command below you will see that verifying the file against the database it has changed. If this where an executable it may either be corrupt or compromised. If it was the project you've been working on for weeks, now is a good time to restore from backup, if the change wasn't expected of course.
>fciv -v -xml fcdatabase.xml filetocheck.txt
You'll see something like:
c:\users\mymcp\fcdatabase.xml
Hash is : 48a5967227b85c6805f3210832a155da
It should be : 04518689efadfdf2393b533dc9c7c8b5
My only real complaint is that fciv doesn't show any sort of progress while processing a large directory. It would be nice to see a file names flying by the screen or something. All in all though this is a tool worth checking out if you run Windows and don't have another tool already in your arsenal.
I would like to know if any of you have a tool in your arsenal already for this purpose and what it is / where I can find it. Sadly I don't recall any of the tools I've used in the past, but this one may become my tool of choice for this job.
Thursday, October 14, 2010
Using PSExec to Defragment your PCs
Way back in 2000 / 2001 I was an IT intern. My job was to do the really manual processes for a small department with in a much larger company. One of those was monthly defrags of all PCs and Laptops (if they where available). I had to go to each and every PC, log on, and start the defrag process manually. I believe this to be my first moment of "I should automate this". Problem was I didn't know how or really where to start. I knew script was the answer, but just couldn't get things to work. I believe I eventually created a scheduled task on each machine (by hand) to do this for us.
Fast forward 10 years and I am still in need of the same thing, as we don't have Vista or Windows 7 deployed. But now I have a much better understanding of what needs to happen and even better I know where to start!
PSExec, which is part of the System Internals PsTools suite is my answer these days. A simple script, run from my PC (still manually for the time being) is able to handle defragmenting all of our PCs.
psexec @C:\Updates\Comps\AppPCs.txt -n 10 -c -f -d JkDefragCMD.exe
I use the files with PC names to speed up re-deployment of everything. The -n 10 flag tells psexec t0 wait 10 seconds before it times out the PC, instead of 60 (I believe this is the default). -c copies the file (jkdefragcmd.exe) to the remote system. The flag -f forces copying, even if the file exists. The flag -d doesn't wait for the process to terminate, this is as asynchronously as I can do.
My next step is to hook this up to task scheduler and have it run the first Sunday or something.
Fast forward 10 years and I am still in need of the same thing, as we don't have Vista or Windows 7 deployed. But now I have a much better understanding of what needs to happen and even better I know where to start!
PSExec, which is part of the System Internals PsTools suite is my answer these days. A simple script, run from my PC (still manually for the time being) is able to handle defragmenting all of our PCs.
psexec @C:\Updates\Comps\AppPCs.txt -n 10 -c -f -d JkDefragCMD.exe
I use the files with PC names to speed up re-deployment of everything. The -n 10 flag tells psexec t0 wait 10 seconds before it times out the PC, instead of 60 (I believe this is the default). -c copies the file (jkdefragcmd.exe) to the remote system. The flag -f forces copying, even if the file exists. The flag -d doesn't wait for the process to terminate, this is as asynchronously as I can do.
My next step is to hook this up to task scheduler and have it run the first Sunday or something.
Monday, October 04, 2010
Enabling the Administrator user in Windows 7
This is a very simple fix. The reasons to actually log on as the administrator are shrinking, but for my environment I need to log on as the Administrator user occasionally (for software patching).
- Open up a command prompt as Administrator (not the same thing we are trying to do)
- Run "net user /active:yes administrator"
- Now it is a great idea to set a password for the Administrator user so we can do that right now
- Run "net user administrator password" but replace password with something more complex similar to "Som3C0mpl3xP@$$w0rd"
- Exit out of the command prompt.
Enabling Ping responses in Windows 7
Out of the box if you Ping a Windows 7 host you will recieve "Request Timed Out". This is because the Windows 7 firewall is blocking ICMP echo requests. If this is causing you problems and you need to open up access to ping requests it is fairly simple.
- Go to the "Windows Firewall" in the Control Panel.
- On the left hand side click "Advanced Settings"
- Click on "Inbound Rules"
- Right click on "Inbound Rules" and choose "New Rule"
- Select "Custom (Custom Rule)" and press "Next"
- Select the (default) "All Programs" and press "Next"
- Change the Protocol type from "Any" to "ICMPv4"
- Unless you want to restrict the ping response choose the option "Any IP address". (This is for your adapter.)
- Unless you want to restrict which hosts can ping you choose "Any IP address".
- On the Action screen ensure it is an "Allowed" connection.
- Leave all three check boxes check on the Profile screen.
- On the final screen, Name, give it a meaningful name such as "Echo Ping Request"
- Finally click finish.
Thursday, August 19, 2010
Rebuilding the Icon Cache in Windows 7 (and Vista)
If you ever need to rebuild the Icon Cache and dearly miss TweakUI for this duty there are three simple command lines to run and a process to kill and then start.
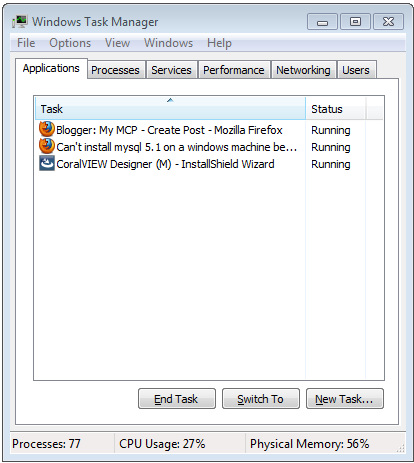
1. Open Task Manager
2. Kill all explorer.exe processes (but leave Task Manager Open)
3. Open a command prompt
4. type "CD /d %userprofile%\AppData\Local"
5. type "DEL IconCache.db /a"
6. type "Exit"
7. Go to Applications Tab in Task Manager and click the "New Task..." button.
8. type "explorer.exe"
1. Open Task Manager
2. Kill all explorer.exe processes (but leave Task Manager Open)
3. Open a command prompt
4. type "CD /d %userprofile%\AppData\Local"
5. type "DEL IconCache.db /a"
6. type "Exit"
7. Go to Applications Tab in Task Manager and click the "New Task..." button.
8. type "explorer.exe"
How to Enable Windows 7 GodMode
God mode in Windows 7 is similar to TweakUI in Windows XP, but is really simple to setup and requires no installation.
1. Create a new folder.
2. GodMode windowRename the folder to
GodMode.{ED7BA470-8E54-465E-825C-99712043E01C}
(note that you can change the “GodMode” text, but the following period and code number are required).
I create this folder in my home directory.
1. Create a new folder.
2. GodMode windowRename the folder to
GodMode.{ED7BA470-8E54-465E-825C-99712043E01C}
(note that you can change the “GodMode” text, but the following period and code number are required).
I create this folder in my home directory.
Subscribe to:
Posts (Atom)