If you're getting rid of your PC at home or retiring PCs in the office it is recommended that you first wipe the drive of any remaining bit of information. I'm not going to debate the merits of method or the other, or if this is even worth while. I'm a firm believer that 99% of the time this tool will wipe your drive and the data will be unrecoverable to most people or attacks. Personally, I run the PRNG method with 8 passes to overwrite the drives I'm getting rid of. This is on top of using secure delete methods to overwrite individual files as I delete them on my PC in day to day operations.
If you're very paranoid anyhow, you should be using something like Truecrypt to encrypt everything at rest on your hard drive, and possibly even a hidden encrypted volume inside of that. Even here, I would wipe a drive when I was done with it.
Once you boot your PC with the burned image you should come to this screen.
If you hit the F2 key you will see this screen.
Hitting F3 will get you this screen.
F4 will get you to this note about RAID devices. Remember always dismantle your RAID volumes before wiping them!
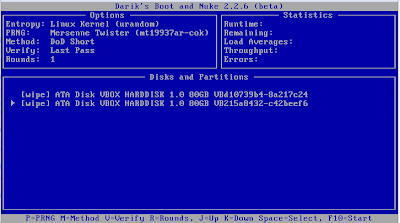
If you hit enter on the Initial Boot screen you'll end up here in Interactive Mode.
In Interactive Mode you can choose which Pseudo Random Number Generator to use. You have two choices (
Mersenne Twister and
ISAAC, but I go with Mersenne Twister, but apparently ISAAC is more secure.
If you need to quickly zero out a drive, such as before re-installing Microsoft Windows or for some other reason this option is for you.
Something to note, if you have multiple drives installed and selected for wipe (from Interactive Mode) they will wipe in parallel. This can speed things up significantly if you have a lot of drives to wipe
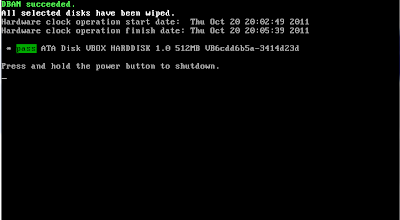
When DBAN has finished you'll come to this screen. If you don't have a Green pass next to each disk you wiped it may be a failed disk.
After running DBAN a few times you should become comfortable with the different options and what they do. I started out running in interactive mode all of the time, but now when I get to the Initial Boot Screen I simply type prng (Which used the prng method with 8 passes and verification on the last pass) and let it go to town. I only do this however on machines where I want to wipe everything. For safeties sake I always physically disconnect drives I do not want to wipe.


2 comments:
Be careful, as it will overwrite any flash drive you've inserted. Even it you're running the program from a bootable flash drive!
Thankfully I keep backups of my flash drive with Microsoft's Flash Drive manager tool.
You're correct. I only use a bootable CD to start DBAN, so this isn't a concern for me. You can use interactive mode to select which disks you wish to sanitize.
Post a Comment