I've been thinking about this for a few weeks now. We currently run a Percona XtraDB cluster with HAProxy installed on each of our application servers. While this provides some good redundancies, the HAProxies don't know how busy the DB nodes are and it won't continue to scale well.
To that end, we're looking to break up the Percona XtraDB cluster into a more traditional Master - Master setup with multiple slaves under each master and HAProxy installed on a pair of servers with a VIP handled by CARP (technically ucarp).
But I'm looking towards the future of MySQL 5.6, the new GTIDs replication, and how to setup HAProxy for that configuration. To that end, in the next week or so I'm going to setup some virtual machines to test this all out with.
Wednesday, February 12, 2014
Friday, September 20, 2013
Copying one file to multiple directories
Just a simple post to remind me how to do this in the future.
I needed to copy a new image to sixty (60) client directories, and symlinking like we would normally do was not an option. Thankfully xargs came to the rescue once again. I found my answer here, but I wasn't going to type out the full paths for each of the sixty directories.
# echo /somedir/*/pub/product/images/ | xargs -n 1 cp -va preview_unavailable.png
Friday, May 11, 2012
FreeBSD Crontabs location
This is a quick blog post, mainly for my notes. In FreeBSD the users crontabs are stored in /var/cron/tabs by default. This is different than I'm used to coming from RHEL and CentOS world where crontabs where stored in /var/spool/cron/
FreeBSD Cron documentation: http://www.freebsd.org/doc/handbook/configtuning-cron.html
FreeBSD Cron documentation: http://www.freebsd.org/doc/handbook/configtuning-cron.html
Thursday, May 10, 2012
How I learn a programming language
Today I'm going to talk about how I learn a new programming language. Let me start by saying that I've never fully mastered a programming language, or even come close. My roles are that of sysadmin and not of an actual programmer. What generally happens is I'm given some task to accomplish, such as modify an already written report in our home brewed application. I will dive into the report and figure out where I need to start modifying things. Or I need to come up with a new process, but since the rest of the home brewed application is written in PHP, I'll write the new process in PHP as well, just to keep everything consistent.
I learn programming by looking at running code and modifying it to do something else or do the same thing but better or more accurately. I have trouble reading through a book and doing the simple examples and building upon that knowledge. It comes from already knowing a bit about programming and feeling dumb for re-reading what a variable is and how to assign it (pretty much the same in all programming languages).
At my last position I was able to learn a lot of PHP and I became very comfortable with it. I had worked with PHP a bit prior to this, but honestly, I had forgotten most of what I had learned. In this case, that is probably for the best, it was all spaghetti code and crap for the most part. The one thing that helped me the most was a good editor (Netbeans for PHP) and of course documentation.
My new position is with a firm that runs perl for nearly 100% of their code base. I've always had a hard time reading perl code in the past (Mostly nagios plugins). Perl uses a lot of syntax that doesn't explain what its doing just by reading it in english. So my typical take something that works and modify it has been a slower process. I'm able to get the end result that I'm looking for, but I wouldn't say "I UNDERSTAND HOW" this code works or what it honestly does.
This had led me to reading the first few chapters of a book (http://www.perl.org/books/beginning-perl/) so that I may understand the HOW something works and WHY it works, not just that it does. This might be the first programming book I actually read all the way through! So far some of the wizardry of perl is going away because I know or at least know where to look up what "=~" does and not have to guess. Some other resources I've used is of course Stackoverflow.com. Some of the users there leave answers that don't just give an answer, but explain how and why it works and examples of other ways to do the same thing.
How do you guys learn a programming language? What tools do you find are the best for learning a new programming language?
Monday, April 23, 2012
FreeBSD sed -i Error "sed: 1: "FILE": bad flag in substitute command: '.' "
On FreeBSD if you use the "-i" flag with sed you must specify a backup file. The simple fix, if you don't want a backup file is to use "" (two quotes, no space between them). You could also use any other filename you wished.
Examples:
BAD: sed -i s/192.168.1.1/192.168.1.44/g file.txt
GOOD: sed -i "" s/192.168.1.1/192.168.1.44/g file.txt
Examples:
BAD: sed -i s/192.168.1.1/192.168.1.44/g file.txt
GOOD: sed -i "" s/192.168.1.1/192.168.1.44/g file.txt
Wednesday, April 18, 2012
Updating the Locate database in FreeBSD (updatedb)
When I was running CentOS boxes if I needed to find a recently installed program or new file I would just run updatedb. That however doesn't work as expected on FreeBSD (9.0 in my case).
When I first installed the machine I tried to run locate SOMETHING and got the error message locate: "database too small: /var/db/locate.database"
My first instinct was to run updatedb, which of course returns "updatedb: Command not found.". It turns out there is a weekly cron job that will update the locate database, but if your server isn't on then (as is the case for me, since its a virtual machine on my local PC to toy around with) then you need to run the command manually.
Just run the following script: "/etc/periodic/weekly/310.locate". It may take a few minutes to run so just let it do its thing, or run it in a screen session.
By the way, I will most likely be posting a lot of FreeBSD tips and tricks in the coming months, as my new company runs mostly FreeBSD and Perl.
Wednesday, October 26, 2011
Using DBAN for Data Sanitation
If you're getting rid of your PC at home or retiring PCs in the office it is recommended that you first wipe the drive of any remaining bit of information. I'm not going to debate the merits of method or the other, or if this is even worth while. I'm a firm believer that 99% of the time this tool will wipe your drive and the data will be unrecoverable to most people or attacks. Personally, I run the PRNG method with 8 passes to overwrite the drives I'm getting rid of. This is on top of using secure delete methods to overwrite individual files as I delete them on my PC in day to day operations.
If you're very paranoid anyhow, you should be using something like Truecrypt to encrypt everything at rest on your hard drive, and possibly even a hidden encrypted volume inside of that. Even here, I would wipe a drive when I was done with it.
The first thing to do is to download the ISO image from dban.org/download. Then you will need to burn the ISO image to a CD. (A quick Google search should get you some results.)
Once you boot your PC with the burned image you should come to this screen.
If you hit the F2 key you will see this screen.
Hitting F3 will get you this screen.
F4 will get you to this note about RAID devices. Remember always dismantle your RAID volumes before wiping them!
If you hit enter on the Initial Boot screen you'll end up here in Interactive Mode.
In Interactive Mode you can choose which Pseudo Random Number Generator to use. You have two choices (Mersenne Twister and ISAAC, but I go with Mersenne Twister, but apparently ISAAC is more secure.
If you need to quickly zero out a drive, such as before re-installing Microsoft Windows or for some other reason this option is for you.
Something to note, if you have multiple drives installed and selected for wipe (from Interactive Mode) they will wipe in parallel. This can speed things up significantly if you have a lot of drives to wipe
When DBAN has finished you'll come to this screen. If you don't have a Green pass next to each disk you wiped it may be a failed disk.
After running DBAN a few times you should become comfortable with the different options and what they do. I started out running in interactive mode all of the time, but now when I get to the Initial Boot Screen I simply type prng (Which used the prng method with 8 passes and verification on the last pass) and let it go to town. I only do this however on machines where I want to wipe everything. For safeties sake I always physically disconnect drives I do not want to wipe.
 |
| Initial Boot Screen |
 |
| DBAN About Page |
 |
| Quick Commands |
 |
| A message about RAID devices |
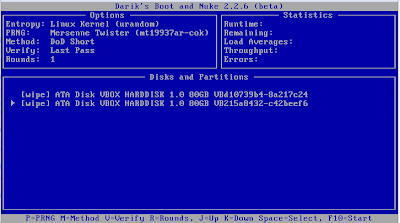 |
| Interactive Mode |
 |
| Pseudo Random Number Generator (Mersenne Twister) explanation |
 |
| Pseudo Random Number Generator (ISAAC) explanation |
 |
| Wipe Method (Quick Erase explanation) |
 |
| Wipe Method (RCMP TSSIT OPS-II explanation) |
 |
| Wipe Method (DoD Short explanation) |
 |
| Wipe Method (DoD 5220.22-M explanation) |
 |
| Wipe Method (Gutmann Wipe explanation) |
 |
| Wipe Method (PRNG Stream explanation) |
 |
| Verification Mode (Verification Off Explanation) |
 |
| Verification Mode (Verification Last Pass Explanation) |
 |
| Verification Mode (Verification All Passes Explanation) |
 |
| Changing the number of rounds |
 |
| Running in parallel |
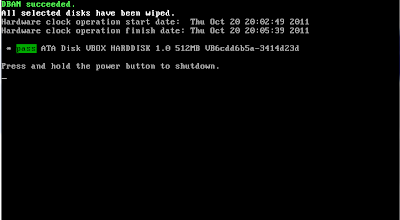 |
| All Done! |
After running DBAN a few times you should become comfortable with the different options and what they do. I started out running in interactive mode all of the time, but now when I get to the Initial Boot Screen I simply type prng (Which used the prng method with 8 passes and verification on the last pass) and let it go to town. I only do this however on machines where I want to wipe everything. For safeties sake I always physically disconnect drives I do not want to wipe.
Subscribe to:
Posts (Atom)